Most broken Time Machine backups come down to one of three things: the backup disk, the connection to it, or damaged backup data on it. Work through them in that order and do not click “Start New Backup” until you have tried to rescue what is already there. If the disk itself is failing, or the Mac holding your only copy of your files is acting up too, that is the point to bring in a technician. Repair Genius sends one to your home or office in Orlando and Winter Park.
This guide is for people who just saw an error such as “backup failed”, “verification failed” or “backup disk not found”, and want their files safe again without making things worse.
TL;DR
- Check the cable, power and connection first. Apple’s troubleshooting guide starts there because it explains most failures.
- When Time Machine offers a new backup, choose “Back Up Later” first. “Start New Backup” deletes your existing history.
- Run First Aid in Disk Utility on the backup disk. If it reports the disk is about to fail, copy off what you can and replace it.
- Once the backup works, test it by restoring one file, and keep a second copy somewhere else.
- A failing disk, a Mac that will not start, or files you cannot lose are good reasons to call a technician, not to keep experimenting.
Table of Contents
- What a Time Machine failure actually means
- Step 1: Rule out the connection
- Step 2: Protect the old backup before you repair anything
- Step 3: Repair the backup disk with First Aid
- Step 4: Check the backups themselves
- Step 5: Know when to start a new backup
- Step 6: Prove the backup works by restoring something
- Why one backup is never enough
- When to stop and call a technician
- Get it fixed at your door
- FAQ
- Sources
What a Time Machine failure actually means
Time Machine is the backup tool built into macOS. It copies your files to an external drive or a network disk on a schedule and keeps older versions, so you can go back to how a file looked last week. Because each backup builds on the earlier ones, one damaged piece can make the whole history look unreliable.
The error messages sound alarming, but they fall into a few groups:
| What you see | Usually means |
|---|---|
| Backup disk can’t be found or mounted | Cable, power, port, network or password problem |
| Backup failed or was interrupted | Disk unplugged, Mac asleep or locked, network drop |
| Time Machine must create a new backup | The existing backup failed a verification check |
| Backup is very slow or seems stuck | Large changing files, a busy disk, a hub or a weak connection |
Apple’s Time Machine troubleshooting page attributes problems to a backup disk that isn’t plugged in, turned on or securely connected, to network problems, and to missing macOS or Time Capsule updates. Start with the boring causes. They are the most common and the cheapest to fix.
Step 1: Rule out the connection
Before you touch any repair tool, spend five minutes on the physical setup.
- Check power and cable. The disk should be plugged in, turned on and firmly connected. Swap the cable if you have a spare. Cables wear out, especially ones that live in a backpack.
- Connect directly. Apple recommends plugging the backup disk straight into the Mac instead of through a USB hub.
- Check the disk size. The same Apple guide suggests a backup disk with at least twice the storage of your Mac, for example 2 TB for a 1 TB Mac. A disk that is too small fills up and starts failing.
- Unlock the Mac and run a manual backup. If Time Machine says a backup was delayed or some files were unavailable, Apple says to complete a manual backup while the Mac is unlocked, because certain protected files need it. Choose Back Up Now from the Time Machine menu bar icon.
- Look at security software and VPNs. Apple notes that VPN or third-party security software can interfere with the connection to the backup disk. Pause it briefly and try again.
If your Mac itself freezes, shows the spinning wheel or restarts on its own during backups, the disk may not be the culprit. Our guide on stopping a Mac spinning wheel explains how to tell, and a same-day visit can settle it.
If the backup is on a network drive
A NAS (network-attached storage, a small always-on drive box on your network) or an old Time Capsule adds more places for things to go wrong. Apple says to check Finder’s Network section and confirm Time Machine support is turned on at the server. Reselect the disk in Time Machine settings, and if the password changed, enter the new one as an administrator.
For Synology users, the maker’s knowledge base lists several settings to confirm, including SMB3 with opportunistic locking, SMB2 lease and durable handles, and Bonjour Time Machine broadcast. It also suggests moving the Time Machine folder to an ext4 or Btrfs volume and temporarily turning off security software. The full list is in Synology’s Time Machine failure article.
Step 2: Protect the old backup before you repair anything
This is where people lose years of history. When verification fails, Time Machine offers two buttons. “Start New Backup” removes the entire existing backup history. “Back Up Later” keeps it but stops new backups for now.
Apple’s advice in its new backup guide is to click Back Up Later and try to retrieve data from the existing backup first. Click Start New Backup only if necessary, because it deletes the existing backup and your data is fully backed up again only once the new backup completes. Macworld’s explanation of what to do when verification fails agrees: after Back Up Later you can still try to pull files out through the regular Time Machine interface.
So before repairing:
- Open Time Machine and browse for the files that matter most: documents, photos, client work, tax records.
- Copy those to another drive or a cloud folder right now.
- Only then move on to repairs.
The point is simple. A repair attempt on a damaged disk can make it worse, and the files you copy out are the ones you will not have to worry about later.
Step 3: Repair the backup disk with First Aid
First Aid is the repair function in Disk Utility, the app Apple includes for checking disks. Open Disk Utility, choose View, then Show All Devices. Apple’s instructions say to run First Aid on each volume and container in turn, then on the storage device itself.
What the result tells you:
- Repair completes. Try a manual backup again.
- “Overlapped extent allocation” errors. Apple says this means two or more files occupy the same space, and at least one is likely corrupted. Expect some damaged files.
- The disk is about to fail. Apple says to back up your data and replace the disk, because it cannot be repaired.
- Repairs keep failing. The disk may be physically damaged. Apple notes that Disk Utility cannot detect or repair every disk problem.
If Disk Utility cannot fix the drive and there are things on it you need, stop. Repeated attempts on a failing drive can reduce what can be recovered. This is the situation our data recovery and backup work is for, and we come to you, so the drive does not travel through the mail or sit in a queue.
Step 4: Check the backups themselves
If the disk passes but Time Machine still complains, the backup data may be damaged even though the hardware is fine. Apple documents a set of command-line tools in the tmutil manual page. The ones most useful for repair work:
tmutil listbackupsshows all completed backups, so you can see what survived.tmutil latestbackupshows the most recent completed backup.tmutil verifychecksumschecks the checksums recorded for backups made since OS X 10.11.tmutil deleteinprogressremoves an in-progress backup. On an APFS backup disk, this reverts the volume to the last backup.tmutil restorecopies items from a backup to a destination.
Some operations need administrator rights and Full Disk Access for Terminal. These commands change data on the disk, and a mistyped path can remove files you wanted. If Terminal is unfamiliar, this is a sensible step to hand over. A technician can run the checks, read the results and tell you plainly what is salvageable before anything is deleted.
Step 5: Know when to start a new backup
Sometimes a new backup is the right call. If the old history cannot be verified, the disk is being replaced anyway, or you have already copied out everything you need, starting fresh is clean and safe. Apple’s guidance is that Start New Backup is for when it is necessary, and the thing to remember is that you are protected only after the new backup finishes. Leave the Mac plugged in, awake and unlocked until it does.
If you are switching to a new disk, use the same sizing rule: at least twice your Mac’s storage. Apple’s prevention advice in the new backup guide also covers three habits that reduce future corruption:
- Keep the backup disk’s firmware up to date.
- Use SMB rather than AFP for network backups when you have the choice.
- Use an uninterruptible power supply (a small battery unit that rides out power cuts) with the external disk. In Florida storm season, that is not an exotic suggestion.
An interrupted backup is not always a failure. Apple says that if the disk was accidentally disconnected or the network dropped, Time Machine resumes once the problem is fixed.
Step 6: Prove the backup works by restoring something
A backup you have never restored from is a guess. Once Time Machine is running again, test it.
Restore a single file. Open the folder where the file used to be, open Time Machine with Spotlight, step back through the backups, select the item and click Restore. Apple says restored items go back to their original location, and many apps also offer File, Revert To, Browse All Versions.
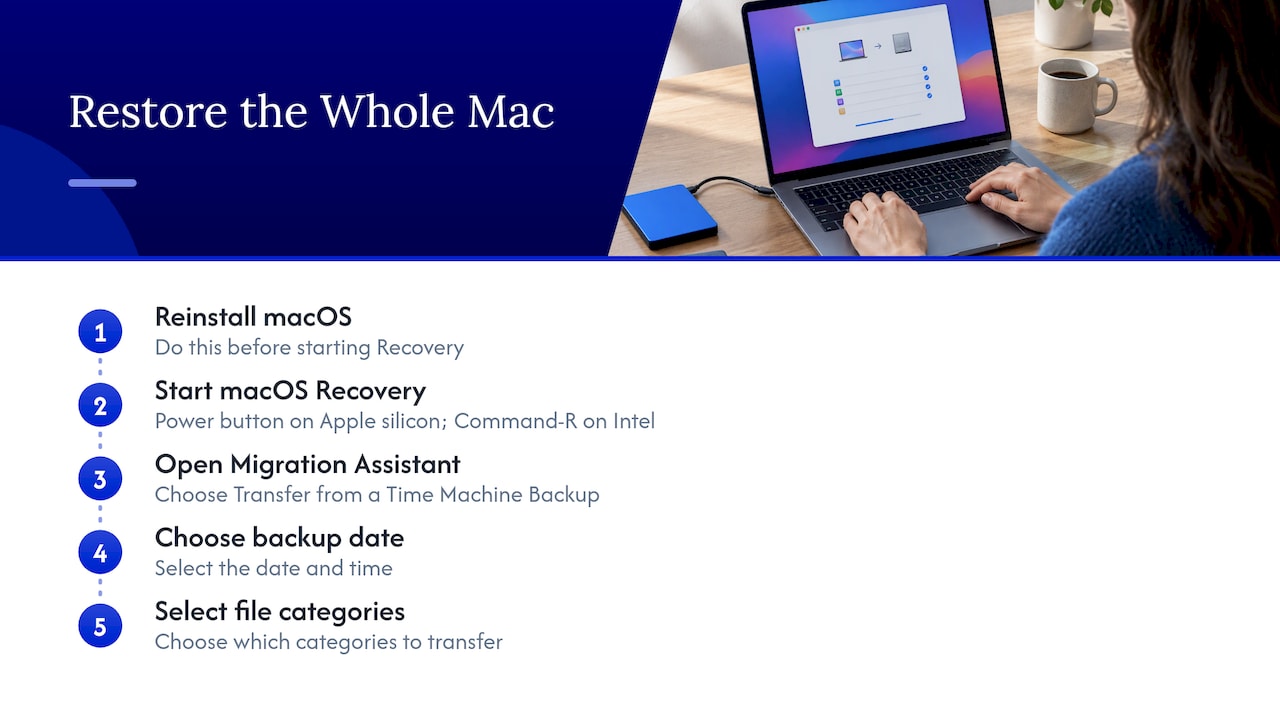
Restore the whole Mac. This is the bigger job, for a replaced drive or a fresh start. Per Apple’s full-recovery guide, you reinstall macOS first, start up in macOS Recovery (hold the power button on Apple silicon, Command-R on Intel), then use Migration Assistant and choose Transfer from a Time Machine Backup, picking the date and time. Afterward, Time Machine may run a full backup at the next scheduled time before returning to incremental backups. A note from Apple on restoring from a backup adds that you can select which categories of files to transfer and choose how to handle a replaced user account’s data.
One compatibility detail catches people out: backups created in macOS 12 or later can only be restored to a Mac running macOS 11 or later, as Apple’s troubleshooting guide states. If you are restoring to a very old machine, check the version first.
Why one backup is never enough
Every step above assumes the backup is the only thing between you and data loss. That is the fragile part. A single external disk can fail, be stolen along with the laptop, or be damaged in the same power surge.
The usual fix is the 3-2-1 backup strategy: three copies of your data, on two kinds of storage, with one copy off-site. For most households that means the Mac, a Time Machine disk and a cloud copy. For a small business, it means the same rule applied to every machine that holds client records.
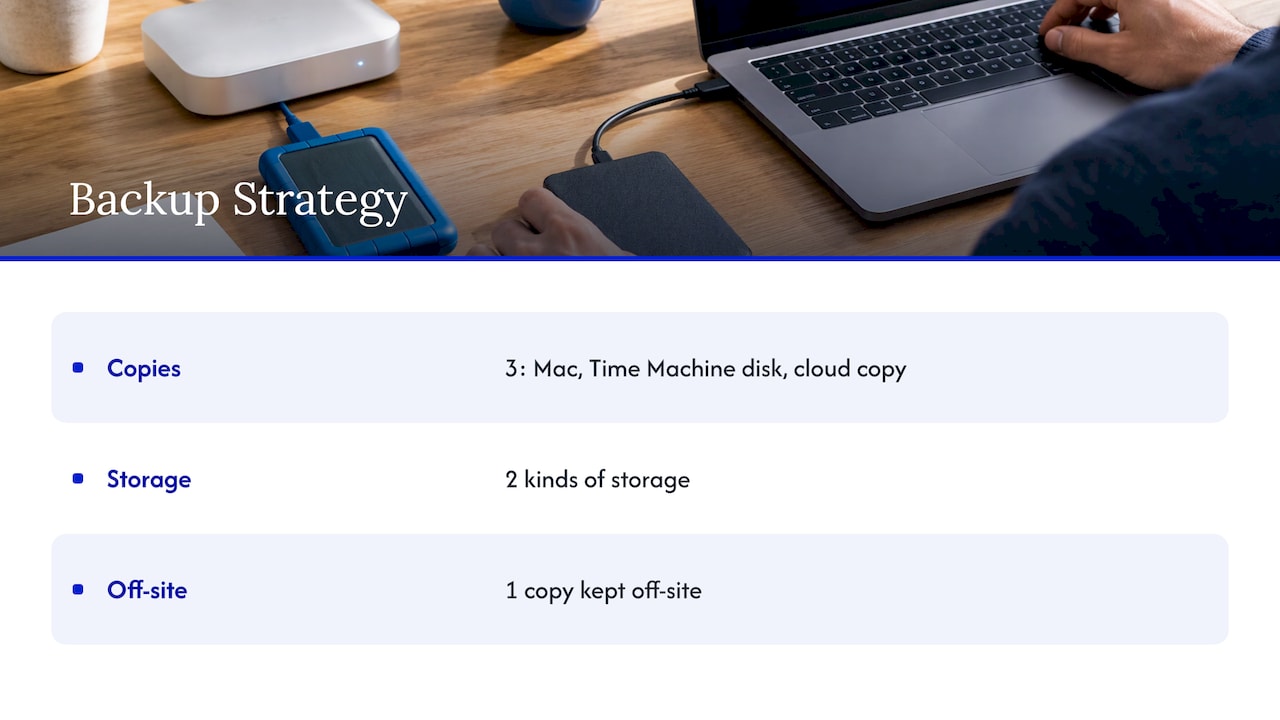
If you are deciding what to keep where, our page on encrypting local backups and using iCloud daily walks through how the two fit together, including why encryption matters before a device goes in for repair.
When to stop and call a technician
Do the steps above yourself if the problem is a loose cable, a setting or a one-off failed backup. Get hands-on help in these cases:
- Disk Utility says the disk is about to fail, or First Aid keeps failing.
- The drive clicks, disappears and reappears, or will not mount at all.
- The Mac will not boot, so you cannot reach Time Machine or Recovery.
- The backup holds the only copy of business records, family photos or school work.
- You are about to erase the backup disk and are not sure what is on it.
- You see kernel panics or random restarts. Our kernel panic repair guide explains what those point to.
A failing backup is often the first sign that something else is wrong, a worn drive, a faulty USB-C port, or a Mac that is struggling. If the Mac drops the disk when you wiggle the cable, the port may be at fault, and our MacBook USB-C repair guide shows how to diagnose it.
What we tell people who come to us with a broken backup
Almost everyone reaches us after the same mistake: they clicked Start New Backup because it was the bright button, and the old history disappeared. Our advice is to slow down. Back Up Later costs you nothing, and it keeps your options open.
The second thing we say is that a backup problem is rarely only a backup problem. The disk, the cable, the port and the Mac are all suspects, and it saves time when one person looks at all of them in the same visit. That is why we do this on site. We come to your home or office in Orlando or Winter Park, look at the Mac and the disk together, and explain what we find before any repair starts.
We work with transparent pricing and no hidden fees, and our repairs carry a warranty on parts and labor. Data safety is part of how we work, because your files matter more to you than the machine does.
Michael
Get it fixed at your door
If your backup disk is failing, your Mac is misbehaving, or you simply do not want to risk your only copy, Repair Genius offers on-site data recovery and backup solutions in Orlando and Winter Park, along with MacBook and iMac repair. Our technicians come to the location you choose, give you a quote up front, and treat data security as part of the job.

You can book through our MacBook and iMac repair page, see how on-site computer repair works for a home or office, or read about on-site MacBook and iMac service in Orlando first. Small businesses with several machines can ask about our business IT and on-site support too.
FAQ
Can I repair a Time Machine backup without losing my history?
Often yes. Choose Back Up Later instead of Start New Backup, copy out the files you need, then run First Aid on the backup disk. Apple warns that Start New Backup deletes the existing backup, so use it last.
Why does Time Machine say it can’t find my backup disk?
The usual causes are a loose or worn cable, a disk that is off, a hub in the middle, or a network drive that changed its password or lost Time Machine support. Check those first, then reselect the disk in Time Machine settings. If the disk still will not mount, it may be failing.
Is it safe to run Disk Utility on a failing backup drive?
First Aid is a normal first step, but it cannot fix every problem. If it reports the disk is about to fail, copy your data off and replace the drive. If the data on it is important and the drive is struggling, have a technician look at it before you try repeated repairs.
Do I need to start over after replacing the backup disk?
Yes, a new disk starts with a new backup, which takes a while the first time. Leave the Mac plugged in, awake and unlocked until it completes. Use a disk with at least twice your Mac’s storage.
Does Time Machine still work on current macOS?
Yes, Apple still supports it and documents it for current macOS releases. Keep macOS updated, and remember that backups made in macOS 12 or later can only be restored to a Mac running macOS 11 or later.
Sources
- Time Machine troubleshooting on Mac, Apple Support
- If you can’t back up or restore your Mac using Time Machine, Apple Support
- If Time Machine on your Mac can’t find your backup disk, Apple Support
- Time Machine backup failed, Synology Knowledge Center
- If you need to create a new backup from Mac, Apple Support
- What to do when Time Machine says a verification failed, Macworld
- Repair a storage device in Disk Utility on Mac, Apple Support
- tmutil(8) manual page
- If a Time Machine backup on your Mac is interrupted, Apple Support
- Restore items backed up with Time Machine on Mac, Apple Support
- Recover all your files from a Time Machine backup, Apple Support
- Restore your Mac from a backup, Apple Support
- 3-2-1 backup strategy
Recommended
- Encrypt Local Computer Backups Before Repair, Use Daily iCloud Too
- Mac Mail Not Syncing? Fixes for iCloud, Gmail and Outlook