
Your Mac refuses to update because the installer needs far more free space than the download size suggests. To fix it, check what is using your storage, back up, remove the big items (old backups, downloads, unused apps, large media), then retry from Software Update. A safe working target is at least 20 GB free, and more on a small drive. If the message stays after you have cleared space, the cause is usually a startup disk or installer problem, and that is where a technician saves you the guesswork. We do this on-site in Orlando and Winter Park.
TL;DR
- Updates need extra working room: the installer stores the download, unpacks it and builds the new system before it removes the old one, so a small update can ask for many times its download size.
- Aim for at least 20 GB free as a floor, and keep roughly 10% of the drive free in general. Apple does not publish an exact figure for the newest release.
- Back up first, then clear space in this order: Trash, Downloads, old device backups, unused apps, large media. Do not bulk-delete System Data.
- If the error persists after cleanup, safe mode, Disk Utility and Recovery are the next steps from Apple’s own troubleshooting guide.
- If you are stuck, short on time or worried about your files, we can come to you the same day.
Table of Contents
- Why a Mac needs so much free space to update
- How much space you actually need
- Step 1: See what is using your storage
- Step 2: Back up before you delete
- Step 3: Free up space, in the right order
- Step 4: Retry the update
- Step 5: What if it still says there is not enough storage?
- When it is worth calling a technician
- Promo
- Our perspective
- FAQ
- Sources
Why a Mac needs so much free space to update
The number in the error message looks unreasonable. The update may be a few gigabytes, yet your Mac wants 20 or 30 GB. That is not a bug in most cases.
According to the Eclectic Light Company, a system update has to store the whole download, expand its contents and install onto the System volume while the old system snapshot is still kept. Only then does it create a new signed and sealed snapshot. The same author estimates that the boot volumes can need as much as about 40 GB at peak during an update. That is the working space the installer needs, and most of it comes back afterwards.
This is why a Mac with a 256 GB or 512 GB drive that looks half empty can still fail. Photos, a Messages history, iPhone backups and a Downloads folder fill a drive faster than most people expect, and macOS also needs room for its own memory swap file.
How much space you actually need
Here is the honest answer: nobody outside Apple can give you one exact number, and Apple does not either. MacObserver reports that Apple’s update and storage support articles do not state exactly how much free space macOS 27 Golden Gate needs.
What we can lean on is the range from past releases:
| Situation | Free space to plan for | Source |
|---|---|---|
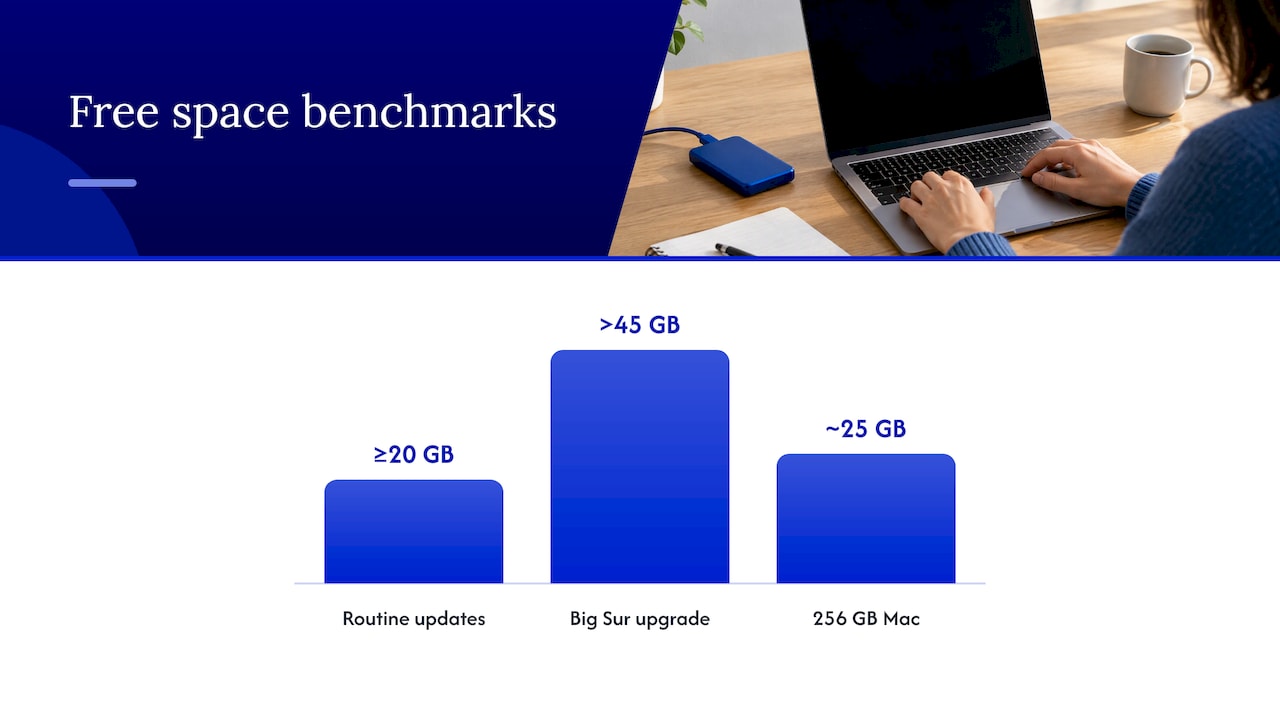
| Recent routine updates | Do not try with under 20 GB free | Macworld, 2024 |
| Older major upgrade (Big Sur) | 35 GB needed on the Mac, so more than 45 GB free before starting | Macworld, 2024 |
| Everyday health of the drive | At least 10% of total storage free | Macworld, 2026 |
The practical rule: on a 256 GB Mac, that 10% is about 25 GB, which also happens to cover most routine updates. On a 128 GB Mac, the same source notes that a large upgrade is especially challenging, so plan on a serious cleanup or moving files off the machine first.
One more point if you are on an older Mac: MacPaw’s guidance for macOS 27 notes it is for Apple silicon Macs only, meaning M1 or later. If your Mac is an older Intel model, the storage message may not be your only obstacle, and a compatibility check comes before any cleanup.
Step 1: See what is using your storage
Before deleting anything, look at the breakdown. Apple’s support page says that on macOS Ventura 13 or later you open the Apple menu, then System Settings, General, Storage. On earlier versions you go to Apple menu, About This Mac, Storage. The categories update as you free space, so you can watch the progress.
Apple’s Mac Help explains that you can choose All Volumes and hover over a color to see how much space each category uses, with light gray showing free space.
Write down the three biggest categories. In most cases they are Photos, Documents (including Downloads) and System Data. That tells you where to spend your effort.
Step 2: Back up before you delete
This step is easy to skip and the one you will regret skipping. A large update rewrites core parts of the system. If something goes wrong, you want your files somewhere else.
MacObserver describes Time Machine as built into every Mac and calls a backup the night before a major update the cheapest insurance available. The path is System Settings, General, Time Machine, Add Backup Disk. The same article recommends an external drive at least twice the size of your Mac’s storage, and “Back Up Now” starts an immediate backup.
Two practical notes:
- Back up to a drive that is not the one you are cleaning. A backup stored on the same full disk defeats the purpose.
- If you also use an iPhone or iPad, how you back those up matters for your Mac’s space and for your privacy. Our guide to encrypting local backups and using daily iCloud too explains the difference.
If the thought of juggling drives and backups before a deadline is stressful, our data recovery and backup work is part of what we do on-site. Details are on our data recovery page for Orlando.
Step 3: Free up space, in the right order
Apple’s own storage guide lists the safe options. It recommends using iCloud to optimize storage, moving files to an external drive, deleting streamable media, clearing Downloads, erasing junk and deleted Mail items, deleting old device backups, uninstalling unused apps, removing unused user accounts, compressing files and emptying the Trash.
Work through them from the quickest wins to the slowest.
Empty the Trash and clear Downloads
Files you deleted are still using space until the Trash is emptied. Then open Downloads and sort by size. Installers (.dmg and .pkg files), old zip archives and large videos you have already watched are the usual culprits. Apple lists clearing Downloads as a recommended step.
Delete old device backups
If you ever backed up an iPhone or iPad to your Mac, those backups can be enormous and are often years old. Apple’s guide includes deleting old device backups. Check that you have a current backup of the device before removing the old one.
Remove apps you no longer use
Open Applications and sort by size. Delete what you have not touched in a year. Games, video editors and old versions of big suites take the most room.
Move or shrink big files
Photos and videos are the largest category for most families. Move them to an external drive, or turn on iCloud optimization so full-resolution originals live in the cloud and your Mac keeps smaller copies. For documents, scanned PDFs add up quickly, and compressing large PDF files can shrink them without moving anything.
Leave System Data alone, mostly
System Data is the category that frightens people. Macworld warns that Apple provides no simple delete button for it because it holds files macOS needs, so only non-essential caches, logs, temporary files, old backups and unused app support files can be removed safely, and only after a backup. Deleting the wrong files can cause instability or prevent the Mac from starting up. If the number looks huge, do not go hunting in system folders. Clear the visible categories above first, and see Step 5.
Step 4: Retry the update
Once you are above your target, restart the Mac, then go to System Settings, General, Software Update. Starting from Software Update is the right route for most people. Do not download a full installer by hand unless you need one, since the installer file itself takes many gigabytes.
Before you press Update, plug in power and use a stable connection. A laptop that dies at 4% battery halfway through an install turns a storage problem into a repair job.
The update may restart your Mac several times and can take a while. A progress bar that seems stuck for a long stretch is common. If your Mac freezes with a spinning wheel afterwards, our guide to stopping a Mac spinning wheel shows what to try and when to call.
Step 5: What if it still says there is not enough storage?
Sometimes you clear 40 GB and the same message returns. That usually means the Mac is counting space differently from what you expect, or something else is blocking the install.
Try safe mode. Apple says safe mode clears certain system caches temporarily and might provide enough space to install a macOS update. Because the extra room is only needed during installation, this can be enough on a tight drive.
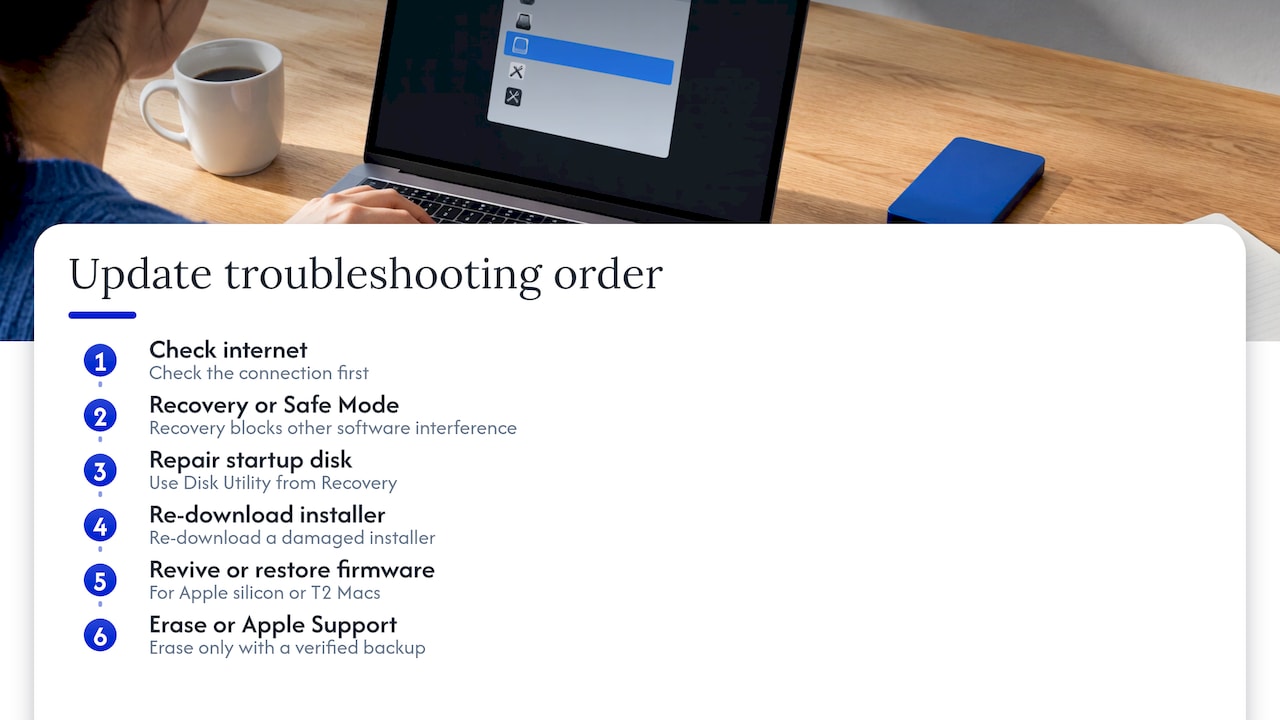
Follow Apple’s update troubleshooting order. Apple’s guide for errors while updating says to check your internet connection, then install from macOS Recovery so other software cannot interfere, or start in safe mode first if you are using Software Update or the App Store. If the problem continues, it says to repair the startup disk with Disk Utility from Recovery and re-download a damaged installer. Further steps are to revive or restore firmware on Apple silicon or T2 Macs. The last resort is erasing the Mac and resetting it, or contacting Apple Support.
Notice what the last steps imply: erasing the Mac is only a safe option if you have a verified backup. That is the point at which many people prefer to hand the machine to a professional rather than risk their files.
Check whether the drive is the problem. A startup disk with errors, or a drive that is nearly full all the time, can fail updates repeatedly. If Disk Utility reports problems, or the Mac crashes and restarts on its own, read our Mac kernel panic repair guide.
When it is worth calling a technician
Most people can clear a few gigabytes and update without help. A technician is worth it when:
- you have cleared space and the error keeps coming back;
- the Mac will not boot into the update, or stops at a logo or progress bar;
- you have important files and no recent backup;
- the Mac is for work and you cannot afford a day of downtime;
- the drive is small and you need a plan, not a one-time cleanup.
For a student with a deadline or a professional with a client call in the morning, waiting for a shop appointment is the real cost. That is the gap we built our on-site service around.
Promo
We repair MacBooks and iMacs where you are, at home, at the office or on campus, across Orlando and Winter Park. Our technicians are certified, pricing is quoted up front with no hidden fees, and repairs carry a warranty on parts and labor. We also handle software troubleshooting and data recovery and backup, so a Mac stuck on an update does not have to mean lost files.

See how it works on our MacBook and iMac repair page, or look at our wider on-site computer repair services if you run a small business with several machines.
Our perspective
Most “not enough storage” calls start the same way. Someone has a Mac that has quietly filled up over years, an update that has been postponed for months, and a deadline that does not move.
The cleanup itself is not hard. The risk is in the order. People delete first and back up never, or they dive into System Data and remove files macOS needs. We would rather you back up, clear the obvious items, and retry. If that does not work, stop deleting and get someone to look at the disk.
That is where on-site repair makes a difference. We come to your home or office, diagnose honestly, tell you the cost before we start, and keep your data safe while we work. Our MacBook and iMac repairs, software troubleshooting and data recovery are all done at your location, often the same day.
A Mac that updates cleanly and has room to breathe is a Mac that lasts longer. If yours is stuck, call us before you try anything drastic.
Michael
FAQ
Why does my Mac say not enough storage when the update is only a few gigabytes?
The installer needs room for the download, the unpacked files and the new system while the old one is still in place. Eclectic Light’s testing found that a small point update can still ask for many times its download size in free space. Most of that room is released after installation finishes.
How much free space should I have before updating macOS?
Plan on at least 20 GB free for routine updates and keep around 10% of the drive free. Larger upgrades have asked for far more, with Big Sur needing 35 GB available per Macworld. Apple does not state an exact figure for the newest release, so more headroom is safer.
Is it safe to delete System Data to make room?
Not in bulk. System Data contains files macOS relies on, and removing the wrong ones can cause instability. Back up first and remove only items you recognize, such as old backups and unused app support files, as Macworld advises.
My Mac still will not update after I cleared space. What now?
Try safe mode, then install from macOS Recovery, and run Disk Utility’s repair on the startup disk, following Apple’s troubleshooting steps. If the Mac still fails, or you have no backup, book a technician before attempting an erase and reset.
Can I update my Mac using an external drive for storage?
The installer needs free space on the Mac’s own startup drive, so the practical approach is to move files off it to an external drive and then run the update. Apple’s storage guide lists moving files to an external drive as a recommended way to free space.
Sources
- Free up storage space on Mac, Apple Support
- See used and available storage space on your Mac, Apple Support
- If an error occurred while updating or installing macOS, Apple Support
- Explainer: Disk free space, The Eclectic Light Company
- How much free space does an APFS disk need?, The Eclectic Light Company
- How to check, clean up, and back up your Mac before macOS 27, MacObserver
- What to do if macOS won’t install, Macworld
- How to clear System Data on Mac, Macworld
Recommended
- Stop a Mac Spinning Wheel in 15 Seconds, When to Call Same Day Repair
- 4 Urgent Mac Malware Signs and What to Tell a Technician
- Mac Kernel Panic Repair: Fix It Step by Step