
Force restart your phone, pull off the case, and disconnect any accessories, then let it try to boot on its own. If it powers on even briefly, back up your data immediately. If it doesn’t, boot into safe mode next, then wipe the cache partition. Save a factory reset for last, and only after you’ve confirmed your Google account credentials, since a reset triggers Factory Reset Protection. If the loop returns after a reflash or happens instantly on every attempt, stop and get the device looked at by a technician instead of pushing further.
TL;DR:
- Running a battery charge above 50 percent before updates reduces the risk of causing a boot loop from power loss during installation.
- Starting with safe mode can identify whether a third-party app or a system issue is causing the reboot cycle, saving data if it is the root cause.
- Wiping the cache partition often resolves temporary system glitches without deleting user data, unlike factory resets which should only be used as a last resort.
- Reflashing firmware is necessary only when software fixes fail and requires matching the exact firmware to avoid bricking the device.
- Signs of hardware problems include a swollen battery, water damage, or immediate reboots even in recovery mode, which demand professional diagnosis to prevent further damage.
Table of Contents
- Quick Checklist Before You Touch Anything Else
- How to Fix an Android Boot Loop Without Losing Data
- When Reflashing Firmware Becomes Necessary
- Signs Your Boot Loop Is a Hardware Problem, Not Software
- Using Logcat and ADB to Pinpoint the Exact Cause
- Backing Up Your Android Phone So This Never Costs You Data Again
- Which Android Updates Have Caused Boot Loops Recently
- Repair Genius’s Take: Why We See More Data Loss From Impatience Than From Hardware Failure
- Book an On-Site Boot Loop Diagnosis With Repair Genius
- Sources
- FAQ
Quick Checklist Before You Touch Anything Else
Before you dig into safe mode or recovery menus, rule out the boring stuff. A dying battery or a bad cable causes more boot loops than people expect, and both are five-minute fixes.
Start here:
- Charge the phone to a sufficient level using a cable and charger you know work on another device.
- Remove the case, SD card, and SIM tray. A swollen battery pressing against a case, or a corrupted SD card, can both trigger repeated restarts.
- Try a force restart. On most Android phones that’s holding Power and Volume Down for 10 to 20 seconds; some newer Samsung and Pixel models use Power alone held for a longer press.
- If the screen flickers to life even for a few seconds, connect to Wi-Fi and let Google Photos, Google Drive, or your carrier’s backup app sync whatever it can.
- Note the exact model number, current build number if visible, carrier, and whether the phone recently installed an update. You’ll need this information for every step that follows.
That last point matters more than it seems. Repair technicians and even Google’s own support flow ask for the build number and update history first, because an Android device that’s restarting or crashing often traces back to one specific update or one specific app, not a mystery failure.
Pro Tip: Screenshot or photograph your phone’s model number and IMEI (found on the box or under Settings, if accessible) now. If the device later needs a technician or a warranty claim, you won’t be digging through a drawer for the box while the phone sits dead.
If none of these quick checks get you a working screen, move to the software fixes below. Don’t skip straight to a factory reset. It’s the most destructive option on this list, and it’s rarely the first thing that actually needs to happen.
How to Fix an Android Boot Loop Without Losing Data
Software problems cause the overwhelming majority of boot loops, according to Honor’s troubleshooting guide, which groups causes into failed updates, incompatible apps, full storage, and malware on one side, and physical damage like water intrusion or motherboard failure on the other. That split matters, because the fix for each is completely different, and jumping straight to a reset skips diagnostic steps that would have saved your photos and app data.
Here’s the order that actually preserves your data:
- Boot into safe mode. On most phones, hold the power button until the power menu appears, then press and hold “Power off” until you’re prompted to reboot into safe mode. Some Samsung models use a different combo: power down completely, then hold Volume Down while powering on. In safe mode, all third-party apps are disabled, which lets you see whether the operating system itself is stable or whether a specific app is the trigger.
- Test for stability. If the phone stays on and behaves normally in safe mode, a downloaded app is almost certainly the cause. Google’s official guidance confirms this is exactly what safe mode is designed to isolate. Uninstall anything you added or updated in the last few days, starting with the most recently installed app, then reboot normally.
- If safe mode doesn’t stabilize it, wipe the cache partition. Power off, then boot into recovery mode (commonly Power + Volume Up on Samsung, or Power + Volume Up + Volume Down held together on other brands). Use the volume keys to navigate to “Wipe cache partition” and the power button to select it. This clears temporary system files without touching a single photo, contact, or app.
- Reboot and test again. Cache corruption from a failed update or an app crash resolves itself here more often than people expect, and it’s a genuinely safe step. Wiping the cache does not erase user data, which is exactly why it belongs before, not after, a factory reset.
- Only if the loop persists, consider a factory reset from recovery. This is where you need to stop and think, not just click through. A factory reset erases everything on the device: photos, messages, app data, saved logins. It also triggers Factory Reset Protection (FRP), a security feature that will lock the phone until you enter the Google account credentials that were signed in before the reset. If you don’t remember that password, or the phone belongs to someone else, do not reset it yet.
Before you get to step five, back up whatever you can. If the phone boots intermittently, even for 30 seconds at a stretch, that’s enough time to trigger a Google Photos sync or plug into a PC and pull files over USB with a tool like Android File Transfer. If you have ADB set up already, adb pull can grab specific folders even when the UI is barely responsive. No boot access at all means your remaining options are cloud backups that synced before the failure started, or a technician who can attempt data recovery from the storage chip directly.
One number worth sitting with: Samsung’s own troubleshooting page recommends keeping your battery above 50 percent before installing any update, precisely because update installations that lose power mid-write are a common cause of the exact loop you’re trying to fix. If your phone had a low battery level when it last updated, that’s a strong clue about what happened.
When Reflashing Firmware Becomes Necessary
If a factory reset didn’t fix anything and the phone still loops, the operating system itself may be corrupted beyond what a reset can repair. That’s when reflashing firmware, essentially reinstalling the entire operating system from scratch, becomes the next real option. This is also the step where a flawed carrier or manufacturer update comes into play: Android Authority documented a widespread boot loop tied to a Galaxy S22 security update, where factory resets frequently failed to provide a lasting fix, and reflashing the official firmware or waiting for a vendor hotfix was the actual solution.
The tools differ by brand, and using the wrong one is how phones get permanently bricked:
- Fastboot is Google’s built-in method for Pixel devices, accessed through volume and power combos to reach the bootloader, where you can manually wipe data or reflash a system image.
- Odin is Samsung’s proprietary flashing tool, used from a PC to push official firmware packages onto Galaxy devices.
- Mi Flash serves the same purpose for Xiaomi and Redmi phones.
Every one of these requires the exact firmware file matched to your specific model number and region. Android’s own partition documentation explains why: system, vendor, boot, and init_boot partitions have to stay consistent with each other, and devices using A/B seamless updates need both storage slots to match. Flash the wrong region’s firmware, or mix a boot image from one build with a system image from another, and you can end up with a phone that won’t even reach recovery anymore.
Before attempting this yourself, confirm you have the correct USB drivers installed, a charge above 50 percent so the process doesn’t cut out mid-write, and a firmware file downloaded directly from the manufacturer, not a third-party mirror. If any part of that setup feels uncertain, this is genuinely one of the points in the boot loop process where paying a technician is cheaper than risking a $500 phone becoming a paperweight.
Signs Your Boot Loop Is a Hardware Problem, Not Software
Some boot loops have nothing to do with software at all, and no amount of cache wiping or reflashing will fix them. Recognizing the pattern early saves you hours of pointless troubleshooting.
Watch for these signs:
- The back of the phone feels warped, or the screen is lifting slightly at the edges. That’s a swollen battery, and it’s a safety issue, not just a repair issue.
- The phone was recently exposed to water, humidity, or a spill, even briefly.
- You see corrosion, discoloration, or a burnt smell near the charging port.
- The phone reboots instantly, within a second or two, even when you’re sitting in recovery mode rather than trying to boot normally.
- Charging behavior is erratic: the battery percentage jumps around, or the phone won’t charge past a certain point.
An instant reboot inside recovery mode is one of the clearer diagnostic signals available to you without special tools, since it points toward failing power delivery or storage hardware rather than a software fault. Continuing to reflash or reset a phone with these symptoms doesn’t just waste time, it can actively worsen physical damage and put stored data further out of reach.
Pro Tip: Never charge a visibly swollen battery, and never pry open a phone case with a swollen battery inside without proper tools. Puncturing a lithium battery is a fire risk, not just a repair inconvenience.
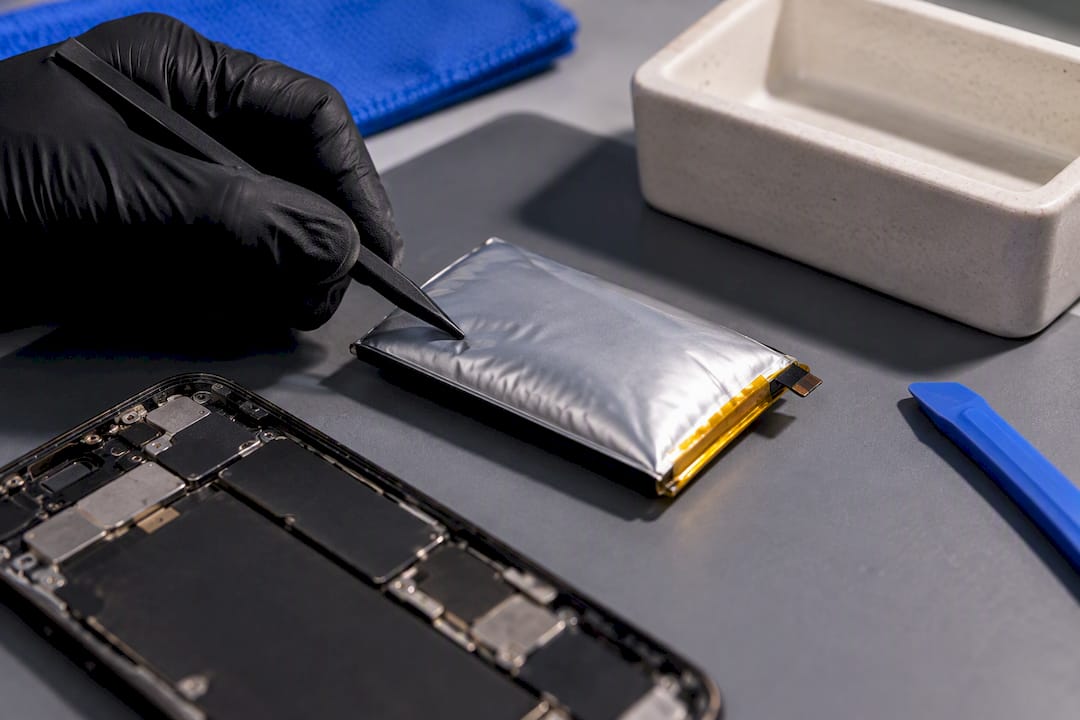
If you’re seeing any of these signs, data is often still salvageable, but only if a technician gets to the storage chip before further attempts damage it more.
Using Logcat and ADB to Pinpoint the Exact Cause
Android Debug Bridge (ADB) and its logging companion, logcat, give you a direct look at what’s happening in the milliseconds before your phone restarts, instead of guessing based on symptoms alone. This step is optional for most readers, but it’s the difference between “something is wrong” and “this specific service is crashing.”
If your phone boots long enough to be recognized by a PC, even for a few seconds, connect it via USB with ADB installed (part of Android’s SDK Platform Tools) and run adb logcat right as the device powers on. The output scrolls fast, but you’re looking for repeated fatal exceptions, a specific process name that crashes right before the restart, or kernel panic messages that point to a specific driver or partition. A crash tied to system_server repeatedly restarting usually points to a corrupted system file or a misbehaving system-level app, which lines up with what wiping the cache partition is designed to fix.
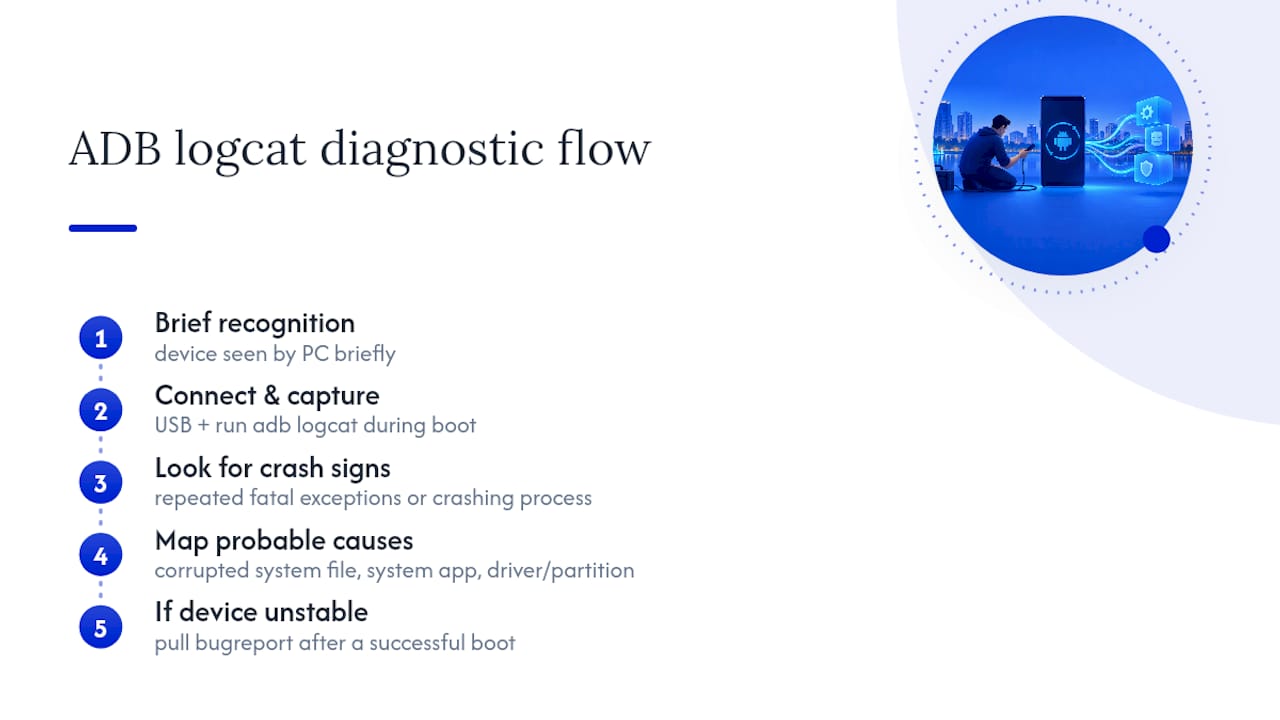
If the device won’t stay connected long enough for logcat to catch anything useful, some phones let you pull a bug report from the previous session using adb bugreport immediately after a successful boot, capturing logs from the crash that just happened. This is genuinely technical territory, closer to what a repair technician does during on-site diagnostics than what most phone owners attempt themselves, but it’s worth knowing it exists if you’re comfortable with a command line and want confirmation before deciding between a software fix and a hardware referral.
Backing Up Your Android Phone So This Never Costs You Data Again
The best time to solve a boot loop is before it happens, and that means backups running automatically, not something you remember to do occasionally. Most people only think about backups the moment their phone won’t turn on, which is exactly the moment it’s hardest to do anything about it.
Set up layered backups now:
- Turn on Google Photos backup for pictures and videos, and confirm Google’s own account backup is active for contacts, call history, and app data under your phone’s system settings.
- Sync important documents to Google Drive automatically rather than saving them only to local storage.
- Periodically connect your phone to a PC and copy your Camera and Downloads folders over manually, since cloud backups can lag by hours or skip large files on slow connections.
- If you use a microSD card, store copies of critical files there too, but don’t treat it as your only backup, since SD cards fail and can themselves cause boot issues.
A phone that backs up nightly turns a boot loop from a crisis into an inconvenience. You lose a few hours getting the device fixed or replaced, not years of photos. If it’s been months since you checked whether your backups are actually running, that’s worth five minutes right now, before you need them.
Which Android Updates Have Caused Boot Loops Recently
Most boot loops aren’t random. A meaningful share trace back to a specific security patch, carrier update, or app update that shipped with a bug affecting a particular chipset or Android version. Samsung’s Galaxy A56 5G, for example, has documented setup-wizard loops tied to specific update installations, which Samsung’s own support page addresses with cache wipes and Smart Switch reinstalls as the recommended fix path.
The more striking case involves the Galaxy S22 series, where a February security update caused boot loops linked to system service crashes widely enough that Android Authority reported on it as an ongoing issue. In that case, factory resets often didn’t hold. The corruption was baked into the update itself, so reinstalling official firmware or waiting for a follow-up patch from Samsung was the actual solution, not another reset.
This is the practical reason to check your phone’s build number and recent update history before doing anything destructive. If your phone updated in the last few days and a boot loop started right after, search for that specific build number alongside your model. A known, documented bug changes the whole strategy: you’re not troubleshooting a mystery, you’re waiting on or applying a fix that already exists. Resetting a phone with a known update bug wastes your data for nothing, since the same corrupted update logic can reassert itself after setup.
Repair Genius’s Take: Why We See More Data Loss From Impatience Than From Hardware Failure
Most of the boot loops we’re called out for in Orlando and Winter Park aren’t hardware failures. They’re phones that went through two or three factory resets before anyone thought to check the build number or try a cache wipe first. By the time we arrive, the software problem is often gone, but so is the data, because the owner reset a phone that a five-minute cache wipe would have fixed.
Our on-site diagnostic process starts exactly where this article does: charge state, recent update history, safe mode behavior, and whether the phone has ever booted since the loop started. That sequence tells us within minutes whether we’re dealing with a corrupted update, a bad app, or something physical like a battery or storage fault. We only recommend board-level work or reflashing when the pattern genuinely points that way, not as a default first move. And when a factory reset is unavoidable, we verify the account credentials with the owner beforehand specifically to avoid an FRP lock turning a repaired phone into a useless one.
The honest gap in most DIY guides is that they treat every boot loop as a software puzzle to solve with patience. Sometimes it is. Sometimes it’s a swollen battery three charge cycles from a real safety problem, and no amount of cache wiping changes that.
— Michael
Book an On-Site Boot Loop Diagnosis With Repair Genius
If you’ve tried the safe steps and your phone is still looping, or you’re staring at a swollen battery and don’t want to touch it yourself, that’s exactly where Repair Genius comes in. Unlike mailing a phone off or sitting in a repair shop waiting room, our technicians come to your home, office, or wherever you are in Orlando or Winter Park and diagnose the boot loop the same day, with transparent pricing quoted before any work starts and no hidden fees added afterward.

Booking is straightforward. Before a technician arrives, jot down your phone’s model number, whether a factory reset has been attempted, and the Google account that was signed in on the device, as that information can speed up recovery and avoid FRP delays if a reset is necessary. An approach that prioritizes your data involves running safe-mode and cache checks before recommending anything destructive, and advising plainly if the issue appears to be a hardware fault needing board-level repair versus a quick software fix.
If your Android phone is stuck restarting right now, start with Samsung & Android Device Repair to see service details and get a same-day quote for your specific model.
Sources
- Fix an Android device that’s restarting or crashing – Android Help
- Fix Boot Loop on Android Phone: A Comprehensive Guide
- Galaxy S22 boot-loop issue after February 2026 update
- Fix Galaxy A56 5G boot loop during Setup Wizard
- How to Fix a Phone Stuck in a Bootloop – ResetFree
FAQ
Can a boot loop be fixed?
Yes, in the majority of cases a boot loop is fixed through safe mode testing, a cache partition wipe, or, as a last resort, a factory reset. Persistent loops that survive a reset and a firmware reflash usually point to a hardware fault like a failing battery or storage chip, which needs a technician rather than another software attempt.
What is a boot loop on Android?
A boot loop is when your Android phone restarts repeatedly during startup and never fully loads the home screen. It’s typically caused by a corrupted system file, a failed update, an incompatible app, or, less often, physical damage from water or a hardware component failing, according to Honor’s troubleshooting breakdown.
How do I get my Samsung out of a reboot loop?
Start by wiping the cache partition from recovery mode, since this clears corrupted temporary files without erasing your data. If that doesn’t resolve it, Samsung’s official support guidance recommends using Smart Switch to check for and reinstall the latest firmware, particularly if the loop began right after an update.
What is the best Samsung boot loop repair tool?
Samsung’s own Smart Switch is the safest starting tool, since it reinstalls official firmware directly from Samsung’s servers rather than a third-party source. For deeper firmware corruption, Odin is the manufacturer-level flashing tool technicians use, but it requires the exact matching firmware for your model and region, and getting that wrong can make the problem worse. If you’re not confident matching firmware yourself, a same-day diagnostic through Repair Genius’s Android repair service avoids that risk entirely.
Should I try a factory reset first?
No. A factory reset should be your last software step, not your first, since it erases all your data and can trigger Factory Reset Protection if you don’t have your Google account credentials ready. Try a force restart, safe mode, and a cache partition wipe first, since these often fix the same issue without any data loss.
Recommended
- Why Your Android Phone Keeps Freezing: Causes & Fixes
- Best Phone Repair Shop in Orlando
- Data Recovery Orlando: What You Need to Know