The iPhone screen repair process is a precise, multi-step procedure that involves removing the damaged display, transferring critical components like the Face ID module and front camera, and resealing the device to restore full functionality. Getting it wrong costs more than the repair itself. Whether you’re weighing a DIY attempt or handing your phone to a technician, understanding the iphone screen repair process explained in full gives you the leverage to make a smarter decision, protect your data, and avoid expensive mistakes.
What are the main steps in an iPhone screen replacement?
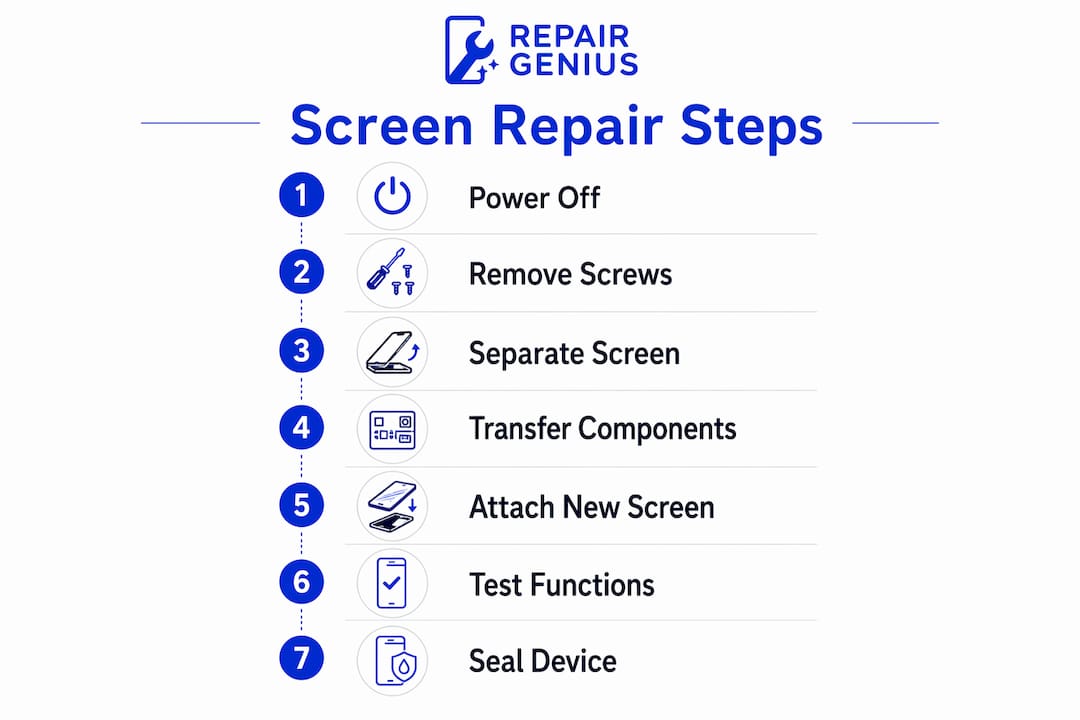
The screen replacement process follows a specific sequence, and skipping any step risks permanent damage. Here is how a professional technician works through it, and what you should know if you attempt it yourself.
-
Power off and disconnect the battery. The phone must be fully powered down before any tools touch the internals. Technicians then remove the two pentalobe screws flanking the Lightning or USB-C port and disconnect the battery flex cable first. Skipping battery disconnection while handling flex cables is one of the most common causes of short-circuit damage.
-
Heat and soften the adhesive. iFixit’s repair guides identify adhesive separation as the greatest risk during screen replacement, not screw removal. A heat gun or iOpener tool is applied around the display perimeter for 60 to 90 seconds to soften the seal. Rushing this step causes the glass to crack further under prying pressure.
-
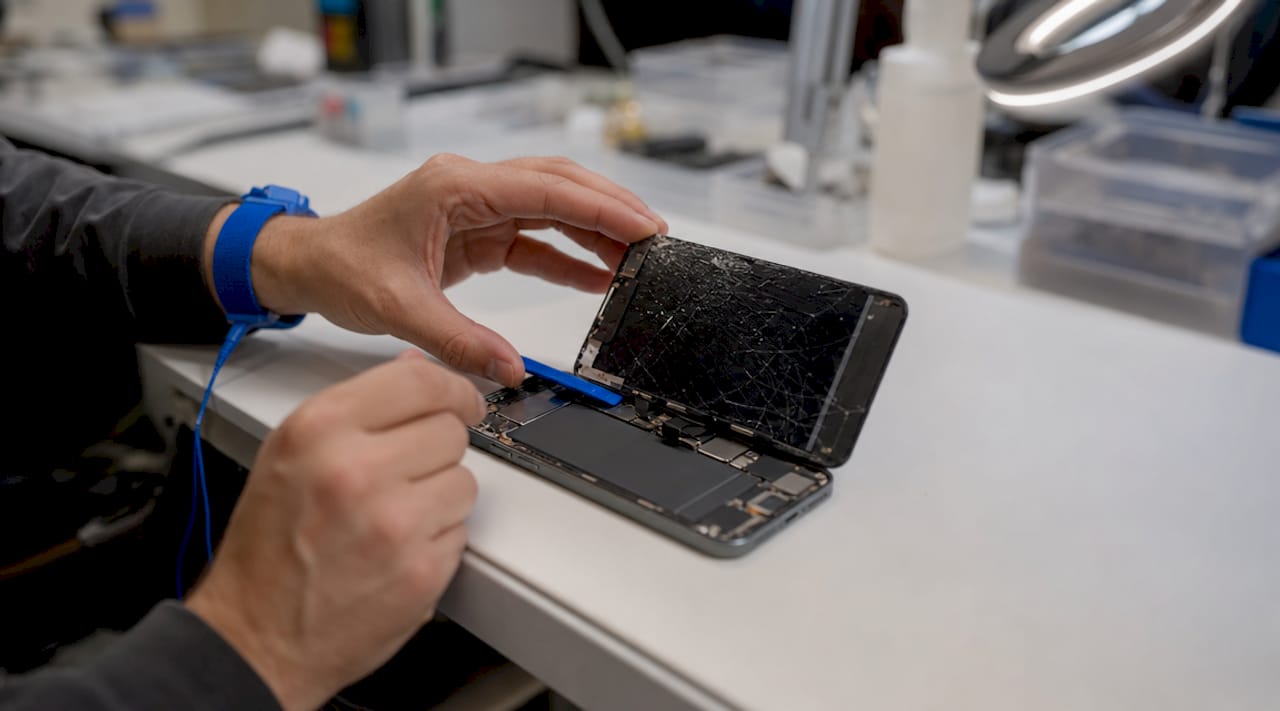
Separate the screen assembly. A suction cup and thin plastic pick are used to create a gap, then the screen is rotated open like a book on its left hinge. The display cable bracket is removed, and the flex cables connecting the screen to the logic board are carefully disconnected in sequence.
-
Transfer critical components. This is where most DIY repairs go wrong. The Face ID module, front camera, and earpiece speaker must be physically moved from the old screen to the new one. These components are paired to the logic board at the software level. Leaving them behind or damaging their flex cables means losing Face ID permanently.
-
Install new adhesive and mount the new screen. Pre-cut adhesive strips are applied around the frame perimeter. The new display is seated carefully, cables are reconnected in reverse order, and the battery is reconnected last.
-
Test before sealing. Testing display functionality including touch response, brightness, Face ID, and True Tone before pressing the screen into its final seal is non-negotiable. Sealing a defective display means reopening the entire phone.
-
Final assembly and water resistance. The pentalobe screws are reinstalled and the adhesive seal is pressed firmly. Professional repairs also replace adhesive seals precisely to restore water resistance, a step that cheaper repairs routinely skip.
Pro Tip: On iPhone 14 Pro and later models, the Always-On Display uses a hard OLED panel with a higher component count. Budget at least 30 extra minutes for component transfer on these models compared to older iPhones.
How do repair costs and timelines vary for different iPhone models?
Cost and time are the two variables that drive most repair decisions. Both depend heavily on your iPhone model and the repair path you choose.
What Apple charges out of warranty
Apple’s out-of-warranty display repair pricing ranges from $119 for the iPhone SE to $429 for the iPhone 17 Pro Max. That range reflects the shift from LCD panels in budget models to OLED and hard OLED in Pro models, which affects brightness, color accuracy, and Always-On Display capability. AppleCare+ drops the cost to $29 per incident in most cases, making it the single most cost-effective screen protection available if you purchased it upfront.
| iPhone Model | Panel Type | Approx. Out-of-Warranty Cost | AppleCare+ Cost |
|---|---|---|---|
| iPhone SE (3rd gen) | LCD | ~$119 | $29 |
| iPhone 15 | OLED | ~$279 | $29 |
| iPhone 15 Pro | Hard OLED | ~$329 | $29 |
| iPhone 17 Pro Max | Hard OLED | ~$429 | $29 |
Third-party repair shops typically charge 20 to 40 percent less than Apple for the same repair, though part quality varies significantly. Apple Authorized Service Providers sit in the middle: they use genuine Apple parts and follow Apple repair standards, often with shorter wait times than an Apple Store appointment.
How long does the repair actually take?
Professional screen replacements typically take 30 to 60 minutes. This is fast because technicians have done the procedure dozens of times and have the right tools ready. First-time DIY attempts take 1 to 2 hours due to the learning curve, and that estimate assumes nothing goes wrong.
Key factors that push repair time higher include:
- Pro model complexity. iPhone 14 Pro and 15 Pro models require additional steps for the Dynamic Island sensor array.
- Adhesive condition. Older phones with hardened adhesive take longer to open safely.
- Component transfer. Transferring Face ID, the front camera, and the earpiece speaker adds 15 to 20 minutes to any repair.
- Testing time. A thorough pre-seal test adds 10 minutes but prevents costly rework.
What are the risks to Face ID and True Tone during repair?
Face ID and True Tone are the two features most likely to stop working after a screen repair, and both failures are largely preventable with the right technique.
Face ID relies on the TrueDepth camera assembly mounted on the display. If the flex cable connecting that assembly is torn, pinched, or stressed during removal, the damage is permanent. Apple is the only party that can restore Face ID after a TrueDepth cable failure, and that typically means a full device replacement at depot repair cost. This is not a recoverable mistake.
True Tone works differently. It requires calibration data that is paired between the display and the logic board. Technicians preserve True Tone by transferring paired sensor assemblies and, on some models, using Apple’s System Configuration tool to re-pair the display. A third-party shop without that tool will leave you with a screen that works but shows a “non-genuine display” warning in Settings.
A screen that passes a visual inspection but fails a software check is still a failed repair. Always verify Face ID, True Tone, and touch sensitivity before you leave the shop or seal the device.
Common DIY risks that lead to these failures include:
- Prying the screen before adhesive is fully softened, which stresses the flex cables
- Forgetting to disconnect the battery before touching any connectors
- Using low-quality replacement panels that lack True Tone calibration data
- Damaging flex cables through premature prying, stripped screws, or inadequate testing before final seal
Pro Tip: Before sealing, run a full Face ID setup reset in Settings under Face ID and Passcode. If the phone refuses to enroll a new face, the TrueDepth module has a connection issue. Catch it now, not after the adhesive cures.
How to choose between DIY, Apple, and third-party repair
The right repair path depends on your model, your budget, and your tolerance for risk. Here is a direct comparison.
| Repair Option | Cost | Part Quality | Warranty | Speed | Face ID Safe? |
|---|---|---|---|---|---|
| Apple Store | Highest | Genuine | 90 days | 1 to 3 days | Yes |
| Apple Authorized Service Provider | High | Genuine | 90 days | Same day possible | Yes |
| Reputable third-party shop | Moderate | OEM or aftermarket | Varies | Same day | Usually |
| Apple Self-Repair Program | Moderate | Genuine | Limited | 2 to 5 days (shipping) | Yes |
| DIY (first attempt) | Lowest | Varies | None | 1 to 2 hours | Risk |
Apple Authorized Service Providers use genuine parts and follow Apple repair standards, making them a reliable alternative to Apple Stores with potentially shorter wait times. Apple’s Self-Repair Program, launched in 2022, lets you rent a professional repair kit and order genuine parts, but the process is complex enough that most users find it slower and more stressful than expected.
Third-party shops are the most cost-effective option when you choose one with a verifiable track record, a written warranty on parts and labor, and technicians who specifically mention Face ID preservation in their process. Ask directly: “Do you transfer the original Face ID module?” If they hesitate, walk out.
For evaluating repair options between shops and on-site services, the key question is not just price. It is whether the technician can demonstrate they understand component pairing, not just panel swapping.
Key takeaways
A successful iPhone screen repair depends on correct component transfer, pre-seal testing, and adhesive management. Skipping any one of these three steps produces a phone that looks fixed but fails within days.
| Point | Details |
|---|---|
| Component transfer is non-negotiable | Face ID, front camera, and earpiece speaker must move from old screen to new screen. |
| Test before you seal | Verify touch, Face ID, and True Tone before pressing the display into its final adhesive seal. |
| Cost scales with panel type | LCD models start around $119; hard OLED Pro models reach $429 out of warranty. |
| Professional repairs take 30 to 60 minutes | First-time DIY attempts take 1 to 2 hours and carry higher risk of permanent damage. |
| AppleCare+ is the best cost hedge | At $29 per incident, it cuts repair costs by up to 93% on Pro Max models. |
What I’ve learned after years of watching screen repairs go wrong
I’ve seen a lot of iPhone screen repairs. The ones that go badly almost never fail because of the screen itself. They fail because someone skipped the test before sealing, used a panel that looked identical to the original but lacked True Tone pairing data, or rushed the adhesive heating step by 30 seconds.
The conventional wisdom says “just go to Apple.” That advice is financially sound if you have AppleCare+. Without it, paying $429 to replace a cracked screen on an iPhone 17 Pro Max is a hard sell when a reputable third-party shop can do the same job for $200 to $280 with a 90-day warranty on parts and labor. The gap is real, and it matters.
What I tell people is this: the repair method matters less than the technician’s understanding of component pairing. A shop that charges $180 and knows how to preserve Face ID is a better choice than one that charges $150 and hands you back a phone with a “non-genuine display” warning. That warning is not cosmetic. It signals that your True Tone calibration is gone and your display health monitoring is compromised.
Post-repair, protect your investment. A tempered glass screen protector from brands like Belkin or OtterBox costs under $30 and absorbs the next drop. A quality case from Spigen or Casetify reduces the chance you’ll be back in this situation in six months. The signs you need a replacement versus a cleaning or minor fix are worth knowing before you commit to a full repair cost.
— Michael
Get your iPhone screen repaired the right way in Orlando
If you’re in Orlando or Winter Park and need a fast, reliable fix, Repair Genius brings the repair to you.
Repair Genius technicians handle the full iphone screen replacement steps on-site, including Face ID module transfer, True Tone preservation, and adhesive resealing for water resistance. Every repair uses genuine or OEM-quality parts and comes with transparent pricing and no hidden fees. Same-day service is available for most iPhone models. With over 10 years of experience and hundreds of satisfied customers across Central Florida, Repair Genius is the alternative to waiting days at an Apple Store. Visit Repair Geniuses to book your repair or get an instant quote for your specific model.
For a detailed breakdown of local pricing, check the iPhone screen repair costs page before you book.
FAQ
How long does an iPhone screen repair take?
Professional repairs take 30 to 60 minutes for most models. First-time DIY attempts typically run 1 to 2 hours and carry a higher risk of component damage.
Will Face ID still work after a screen replacement?
Face ID works after repair only if the original TrueDepth camera assembly is carefully transferred to the new screen. Damage to the TrueDepth flex cable during removal is permanent and can only be resolved by Apple.
What does an iPhone screen repair cost without AppleCare+?
Out-of-warranty Apple display repair ranges from $119 for the iPhone SE to $429 for the iPhone 17 Pro Max. Third-party shops typically charge 20 to 40 percent less.
Why does my screen show a “non-genuine display” warning after repair?
This warning appears when the replacement panel lacks the True Tone calibration data paired to your logic board. It means the shop used an aftermarket panel without proper component pairing or Apple’s System Configuration tool.
Is it worth repairing a cracked iPhone screen instead of replacing the phone?
Screen repair costs a fraction of device replacement in almost every case. A $200 to $280 third-party repair on a cracked iPhone screen extends device life by years and preserves all your data without a migration process.
Recommended
- iPhone Screen Repair Orlando: Signs You Need Replacement or Cleaning
- iPhone Battery Replacement vs Buying New | Repair Guide
- iPhone Screen Repair Cost and Same Day Repair in Orlando
- Cracked iPhone Screen Repair Near Me