A failed BIOS update usually leaves one of two situations: the computer still starts and shows an error, or it will not start at all. Both are often recoverable. Most manufacturers build a recovery path into their machines, and your files on the drive are normally untouched. The risky part is what you do in the first ten minutes: repeated forced shutdowns, random jumper changes and flashing a second file can turn a fixable problem into a motherboard replacement. If you are in Orlando or Winter Park and the machine will not come back, our on-site computer repair comes to your home or office instead of asking you to carry a dead laptop across town.
This guide explains how to tell what actually happened, which recovery steps the manufacturers themselves publish, and the point where you should stop and hand the machine over.
TL;DR
- If the computer still boots to Windows, do not run a BIOS recovery. Run the maker’s diagnostics and retry the update properly.
- If it will not boot, check the power LED or beep pattern, then use your maker’s recovery method (Dell, HP, ASUS, Intel and Lenovo each publish one).
- Clearing the CMOS is the usual first step, but it erases your custom BIOS settings, so note them down first if you can.
- A failed BIOS update does not erase the files on your drive. Keep them safe before any reinstall.
- Jumpers, battery removal and board-level work are where a careful technician earns their fee. Stop there if you are unsure.
Table of Contents
- First, confirm the update really failed
- What a failed update does and does not damage
- What to do in the first ten minutes
- Recovery when the computer still boots
- Recovery when the computer will not boot
- Why updates fail, and how to avoid a repeat
- Protect your files before anything else
- When to stop and get help
- Get it fixed at your door in Orlando or Winter Park
- Our perspective
- FAQ
- Sources
First, confirm the update really failed
Not every scary screen is a failure. Some machines restart several times during a normal BIOS update, go black for a minute or two, and spin the fans at full speed. Interrupting that process is what causes the damage, so the first rule is patience.
The signs of a real failure depend on the maker:
- ASUS boards with BIOS FlashBack: ASUS says the update has failed if it is interrupted, the computer cannot boot, or the indicator light flashes for more than 5 seconds and stays on. A successful update shows when the light goes off, typically within about 8 minutes.
- Dell computers: Dell’s recovery guide applies when the machine does not start, shows a black screen, displays blinking LED patterns, or fails the Power-On Self-Test (POST, the check the computer runs on itself at startup).
- Windows Update on a Dell with a separate graphics card and BitLocker: the update can simply fail to apply. Dell explains why: Windows Update lacks the logic Dell’s own tools use to suspend BitLocker (Windows drive encryption) before the update. That is a stalled update, not a damaged BIOS.
If your machine boots into Windows normally, Dell specifically says not to use the BIOS recovery procedure. The same applies if you see hardware error messages (run diagnostics instead) or if the computer has physical or liquid damage. In those cases the BIOS is probably fine and something else is wrong.
If the update was started from Windows and the machine appears frozen on a “Windows Update” screen rather than a BIOS screen, our guide on fixing a stuck Windows update covers that different situation.
What a failed update does and does not damage
The BIOS (or UEFI, its modern version) is the small program on the motherboard that wakes up the hardware and hands control to Windows. An update rewrites it. If power or the process is interrupted halfway, the board can be left with a half-written program and no way to start.
Two facts calm most people down:
- Your files are not in the BIOS. A Microsoft community answer from an Independent Advisor notes that a failed BIOS update does not affect files on the hard drive or SSD. The drive can be connected to another computer to recover files. If the motherboard ends up replaced, Windows may need reinstalling, which is why a backup matters.
- Many boards have a recovery layer. The same answer points out that modern boards often include recovery features such as ASUS CrashFree BIOS.
The severe case is real, though. Lenovo warns that turning off or suspending the computer during a UEFI BIOS update may require the system board to be replaced, and that on Windows 10 the update needs a full shutdown, not a hybrid one, to complete correctly. That is why the next section matters.
What to do in the first ten minutes
Do this in order, and resist the urge to try everything at once.
- Wait. Give the update time. Intel says its Power Button Menu recovery takes 2 to 5 minutes, and ASUS FlashBack can take around 8. Do not unplug the machine while a light is still flashing.
- Keep it on reliable AC power. HP’s service guide says a BIOS update should only run on reliable external AC power, not on battery or through a docking device, and that you must not unplug power, shut down, sleep the computer, or connect or disconnect any device during the update.
- Disconnect everything extra. Remove USB drives, printers, docks and other peripherals.
- Write down what you see. Note any error text, the power LED flash pattern or beep codes, the model name and the serial number. HP’s guide tells users to check the power LED flash patterns or beep codes as error indicators and to record the product ID and serial number before calling for support.
- Do not repeatedly hold the power button. Forced restarts are fine for a stuck screen that is not mid-flash, but once you are sure the process is over, try the maker’s recovery method rather than cycling the power.
If you cannot get past step 4 with a laptop that stays black, the manufacturer-backed checks for a laptop that won’t boot walk through what to confirm before assuming the worst.
Recovery when the computer still boots
If you can reach Windows or the BIOS setup screen, the usual cause is that the update never completed. The fixes are mostly about doing the update correctly the second time.
Dell’s troubleshooting guidance for a failed or stuck update lists the checks that matter:
- Confirm the machine is on AC power and charge the battery to at least 50% for the retry.
- Disconnect all peripherals.
- Verify that BIOS, system and drive passwords and drive encryption were disabled or suspended first.
- Try a different update method, such as the Standalone Update Utility.
- Confirm the downloaded file matches your exact model.
All of this comes from Dell’s BIOS and UEFI update guide, which also names skipped security steps as one of the most common causes of an update failing, hanging, or leaving the drive inaccessible.
The wrong-file error
On ASUS boards, the EZ Flash message “Selected file is not a proper BIOS!” means the file is for a different motherboard model, or that it is older than the installed version, since downgrades are not supported. Download the file listed for your exact board and try again. Intel likewise says downgrading a BIOS is not recommended and may not be supported.
BitLocker and the recovery key
Because a BIOS update changes the firmware measurements that encryption checks at startup, Dell explains it can trigger a recovery-key prompt or temporarily make data inaccessible. Suspend BitLocker before updating, and keep the recovery key available beforehand. If you are suddenly asked for a key after an update, find it in your Microsoft account or wherever your IT administrator stored it before you do anything else.
Recovery when the computer will not boot
This is the case most people searching this phrase are in. The methods below come from the manufacturers. Find your brand, follow only its method, and stop if something does not match what you see.
Step 1: Clear the CMOS
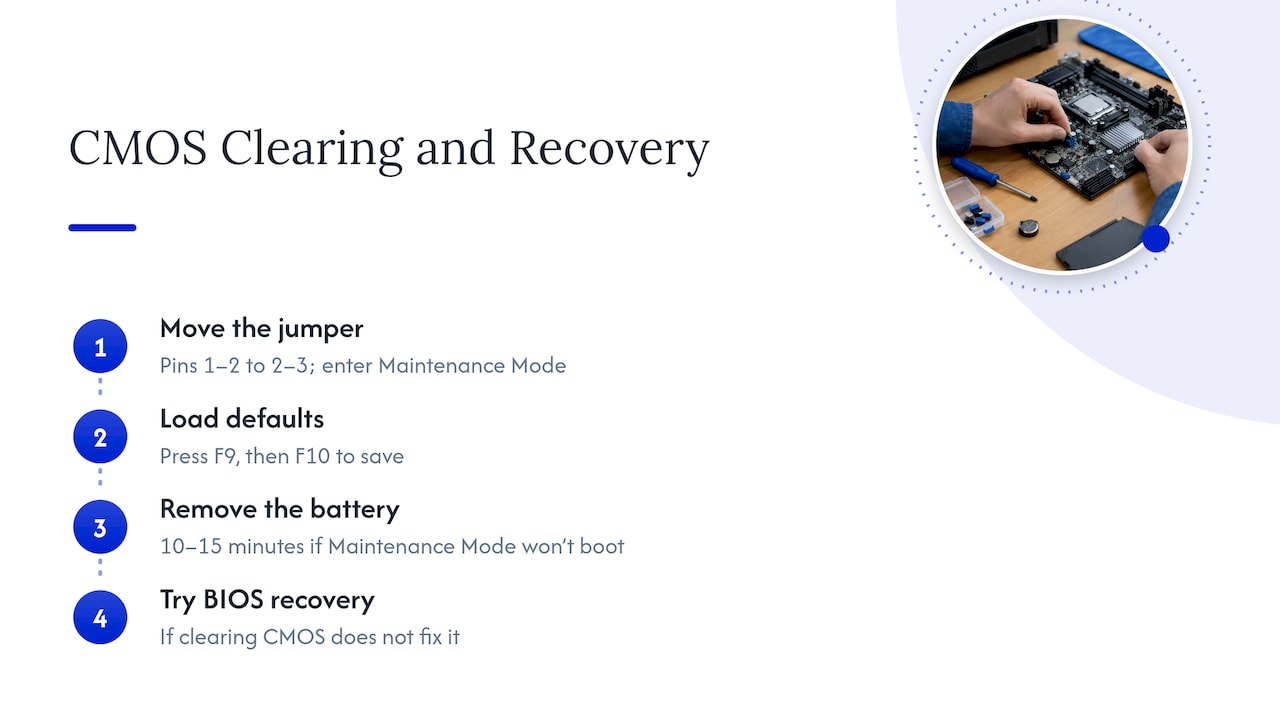
Intel’s guidance for desktop boards that will not start after an update is to clear the CMOS first. The CMOS holds your BIOS settings, and clearing it can solve corruption but erases every custom setting and requires resetting the date and time. Record your settings beforehand if you still can.
Intel gives two ways on its desktop boards: move the configuration jumper from pins 1 to 2 over to pins 2 to 3 to enter BIOS Maintenance Mode (then F9 for defaults and F10 to save), or remove the board battery for 10 to 15 minutes if Maintenance Mode will not boot. If clearing the CMOS does not fix it, Intel says to try a BIOS recovery.
This is a desktop procedure. On a laptop, the battery and board are not something to open casually, and HP warns that voltage is always present on the system board while the machine is plugged in. Unplug first and let components cool before touching anything inside.
Step 2: Use the maker’s recovery method
| Brand | Recovery method | What you need |
|---|---|---|
| Dell | Hold Ctrl + Esc while powering on until the BIOS Recovery page appears (Dell) | A USB drive with the recovery file, or the built-in option on supported models |
| HP desktops | Turn off, hold Windows + B, hold the power button for 2 to 3 seconds, release power while still holding Windows + B (HP) | A working hard drive, since the emergency recovery installs the last known good BIOS from it |
| ASUS | CrashFree BIOS 3 detects the damaged BIOS and offers recovery (ASUS) | A support DVD, or a FAT16/32 USB drive of 1 GB or larger with the renamed .CAP file |
| Intel desktop boards | Power Button Menu: hold power for 3 seconds, press F4 with a USB drive holding the .BIO file, wait 2 to 5 minutes (Intel) | A USB drive with the recovery file |
| Lenovo desktops | Disconnect power, move the Clear CMOS/Recovery jumper from pins 5 to 6 over to pins 2 to 4, boot from the BIOS update disc (Lenovo) | The BIOS update disc |
A few details that trip people up:
- HP restores automatically first. On restart, an HP computer tries to restore the BIOS from a hidden partition. Only if that fails does the manual Windows + B method apply, and it needs the drive to still work.
- ASUS wants defaults afterward. After CrashFree recovery, ASUS recommends pressing F5 to Load Optimized Defaults to avoid instability from incorrect settings.
- Lenovo needs the jumper moved back. After the automatic recovery runs, return the jumper to its original position and restore BIOS settings to an earlier point.
- Intel’s jumper method has a cost. The BIOS security jumper method clears TPM, Intel PTT and HDCP keys, and those will not be restored. TPM is the security chip many Windows features rely on, so this matters if your drive is encrypted.
- Prepare the USB drive on a second computer. The recovery file must be the exact one for your model, copied in the format the maker specifies.
Why updates fail, and how to avoid a repeat
Most failures trace back to a short list of causes.
- Power loss or interruption. HP lists a power surge or outage, a failed upgrade, a virus, or even normal operation as ways the BIOS can become corrupted. Intel recommends a steady power supply, preferably a UPS (a battery backup unit), for any update.
- Skipped security steps. Encryption and passwords that were not suspended, as Dell describes above.
- Wrong file. A BIOS for a different model or an older version.
- Low battery or a peripheral in the way. Dell asks for a laptop charged to at least 10% and plugged in for the entire update, with all programs closed.
- Hybrid shutdown instead of a full one. Lenovo’s specific warning for Windows 10.
Before any future update, back up your data, write down your non-default BIOS settings, plug into AC power, and confirm the exact model number. Also ask whether the update is needed at all: if your computer works well and the release notes do not address a problem you have, the update is optional. If you are shopping for a new machine and want one that is easier to service, these laptop repairability checks show what to look at before you buy.
Protect your files before anything else
If the next step involves a reinstall, a drive swap or a motherboard replacement, your files are the one thing you cannot get back from a manufacturer. HP warns that its Recovery Manager does not automatically back up personal data, so anything you want to keep should be saved first. If the machine will not start, the drive can usually be read from another computer or through a technician’s connection. Our overview of data recovery in Orlando explains what recovery involves and what to prepare.
When to stop and get help
Stop trying yourself when any of these is true:
- The recovery method for your brand did not start, or started and failed.
- You have cleared the CMOS and the machine still shows nothing.
- It is a laptop and the next step is opening the case, moving a jumper or removing a battery.
- The machine has liquid damage, physical damage, or hardware error messages. Dell says BIOS recovery is not the answer there; diagnostics are.
- The computer holds business or school data you cannot lose.
A dead board after a failed update can also be a sign of a deeper hardware fault. Our guide to laptop motherboard failure symptoms and fixes shows how that looks, and the repair-before-replacement checklist helps you weigh a repair against a new computer.
Get it fixed at your door in Orlando or Winter Park
Repair Genius provides on-site computer repair in Orlando and Winter Park, with same-day service, quotes given up front with no hidden fees, certified technicians, and a warranty on parts and labor. Our services include hardware repairs and upgrades, software troubleshooting and data recovery and backup solutions, and our approach to every job puts the security of your data first. We have more than 10 years of experience and offer advanced board-level repairs, which matters when a failed firmware flash has left a machine that will not start.
We come to the location you choose: your kitchen table, your dorm, your office. You can see on-site computer repair services and book from there.

For a work computer, a student’s laptop before finals, or a family machine, being able to hand over the problem at home and get a clear quote before work begins is usually the difference between losing an afternoon and losing a week.
Our perspective
A failed BIOS update is stressful because the computer gives you nothing to look at. No screen, no error, sometimes only a blinking light. The instinct is to try everything: hold every key, pull every cable, flash again.
We think the better approach is the opposite. Find out exactly what the machine is telling you, use the one recovery path your manufacturer documents, and protect the data before you experiment. The published guidance from the makers is consistent on that point, and it is the routine we follow.
What an on-site visit adds is a second pair of experienced hands where the risk is highest: the jumper, the battery, the board. Our technicians are certified, our quotes are given up front, and our repairs carry a warranty on parts and labor. When the answer is a simple recovery, you find out quickly. When it is a board-level repair, you hear that plainly, with the price, before we start, and without leaving home.
Michael
FAQ
Can a failed BIOS update be fixed?
Often, yes. Many computers include a recovery feature, such as Dell’s Ctrl + Esc recovery, HP’s Windows + B emergency recovery, or ASUS CrashFree BIOS. Clearing the CMOS is also a common first step. If those do not work, a technician can address the board directly.
Will I lose my files after a failed BIOS update?
Normally not. The BIOS lives on the motherboard, not on your hard drive or SSD, so the drive’s contents are generally unaffected. If the board has to be replaced, Windows may need reinstalling, so having a backup is the safe course.
Should I remove the CMOS battery right away?
No. Intel’s guidance puts moving the CMOS jumper first on its desktop boards and describes battery removal (for 10 to 15 minutes) as the fallback if Maintenance Mode will not boot. Clearing also resets your custom settings. On a laptop, opening the case is a good moment to call a technician.
Can I try the update again?
Only if the computer boots and you have fixed the cause. Use AC power, a charged battery, no peripherals, suspended encryption, and the exact file for your model. If the machine does not boot, use the maker’s recovery method first.
Sources
- ASUS: How to use USB BIOS FlashBack
- Dell: How to recover the BIOS on a Dell computer
- Microsoft Q&A: BIOS update interrupted
- Dell: BIOS and UEFI update guide
- Dell: BIOS update through Windows Update fails
- HP: Recovering the BIOS
- ASUS: BIOS fails to update
- Lenovo: BIOS update ReadMe
- Intel: Computer doesn’t boot after BIOS update
- Intel: Express BIOS update instructions
- ASUS: CrashFree BIOS 3 recovery
- Lenovo: Updating and recovering the BIOS
- HP: Maintenance and Service Guide
- HP: Getting Started Guide
- FactRated: Laptop repairability checks
Recommended
- 6 Manufacturer Backed Checks When Your Laptop Won’t Boot
- Laptop Motherboard Failure: Symptoms, Causes, and Fixes
- Windows Blue Screen: What It Means and How to Fix It