The fastest fix is a specific order of operations: open Settings, let iPhone Storage recommend what to offload, delete your largest apps and videos, clear out big Messages attachments, and turn on Optimize iPhone Storage for Photos. Many people can reclaim noticeable space quickly without deleting anything they actually want. If storage stays stubbornly full after that, a backup-and-restore or a visit to a repair professional is recommended as the next step.
TL;DR:
- Most space can be freed by acting on recommendations, offloading apps over 1 GB, and deleting large message attachments, without losing personal data.
- Using iCloud Photos with Optimize Storage enabled requires sufficient iCloud capacity; otherwise, local optimization cannot free space effectively.
- Clearing Safari cache, reviewing media downloads, and deleting app cache or documents and data are effective ways to reduce System Data and app bloat.
- Persistent storage issues with “Other” or System Data may necessitate backup-and-restore or professional repair if numbers remain abnormally high.
- Regularly reviewing and managing large media files, message attachments, and app caches prevents recurrent full storage warnings and prolongs device usability.
Table of Contents
- Storage Full iPhone Options: The 10-Minute Checklist
- How to Check iPhone Storage the Right Way
- Managing Photos and Videos Without Losing a Single One
- Clearing Out Large Messages Attachments
- Offloading and Deleting Apps: What’s the Difference
- Removing Downloaded Music, Podcasts, and Videos
- Understanding “Other” and System Data (and Why It Grows)
- Advanced Fixes for Storage That Won’t Budge
- When Cleanup Isn’t Enough: A Professional’s Take
- Sources
Storage Full iPhone Options: The 10-Minute Checklist
Run through these in order. Each step builds on the last, and most people never need to reach step 5.
- Open Settings > General > iPhone Storage. Wait a few seconds for the bar and recommendations to load, then read what Apple is actually telling you before touching anything.
- Act on the top 1 to 3 recommendations. These usually target your biggest, safest wins, like offloading an app you have not opened in months.
- Offload or delete your largest apps. Sort the app list by size, not alphabetically, and offload anything over a gigabyte that you are not using daily.
- Review Large Attachments in Messages. Delete the videos and photos you already have saved elsewhere, then empty Recently Deleted in the Photos app so the space actually returns.
- Turn off automatic downloads for Music and Podcasts, and clear Safari data. This stops downloaded media and browser cache from quietly refilling the space you just freed.
- Still full? Move to advanced fixes like backup-and-restore, or get a professional opinion if storage numbers look wrong or won’t budge.
None of this requires deleting a single photo you care about, and you can also try using best AI video editors for iPhone to compress large videos before deleting or exporting them. Offloading an app, for instance, removes the app itself but keeps its documents and data, so when you reinstall it later, your information reappears.
Pro Tip: Do steps 1 through 4 before you ever consider a factory reset. Nine times out of ten, the “storage full” warning disappears after clearing large attachments and offloading a couple of apps. Skipping straight to a reset risks losing settings and login sessions you didn’t back up.
The order matters because it moves from zero-risk to slightly-more-involved. You are not gambling anything by offloading an app or reviewing a large video attachment. You are gambling a little more time (and possibly some re-setup) if you jump straight to a full restore. Work the list top to bottom and stop as soon as your storage bar looks healthy again.
How to Check iPhone Storage the Right Way
Go to Settings > General > iPhone Storage. This single screen is where Apple documents the entire process of checking and managing what’s eating your space, and it’s more useful than most people realize because it doesn’t just show a number, it tells you what to do about it.
At the top, you’ll usually see a Recommendations panel. This might suggest offloading unused apps, reviewing large Messages attachments, or enabling Optimize iPhone Storage for your photo library. Tap Show All if the panel is collapsed. These suggestions are personalized to your actual usage, not generic advice, so they’re worth acting on before you start manually hunting through apps.
Below that sits the color-coded storage bar, broken into categories:
- Apps — installed software and everything inside it
- Photos — your camera roll, including videos
- Media — downloaded music, podcasts, and movies
- Messages — attachments piling up in text threads
- System Data (sometimes labeled “Other”) — caches, logs, and temporary files
Under the bar, iPhone lists every app by size. Tap any app to see its breakdown, and pay attention to the Last Used date next to it. An app you haven’t opened in eight months but that’s hoarding 3 GB is your first target. Manual review makes sense for apps with unusually large “Documents & Data” footprints; the automated recommendations handle the rest.
Managing Photos and Videos Without Losing a Single One
Photos and videos are almost always the biggest single category on a full iPhone, and they’re also the one people are most afraid to touch. Good news: you don’t have to delete anything.
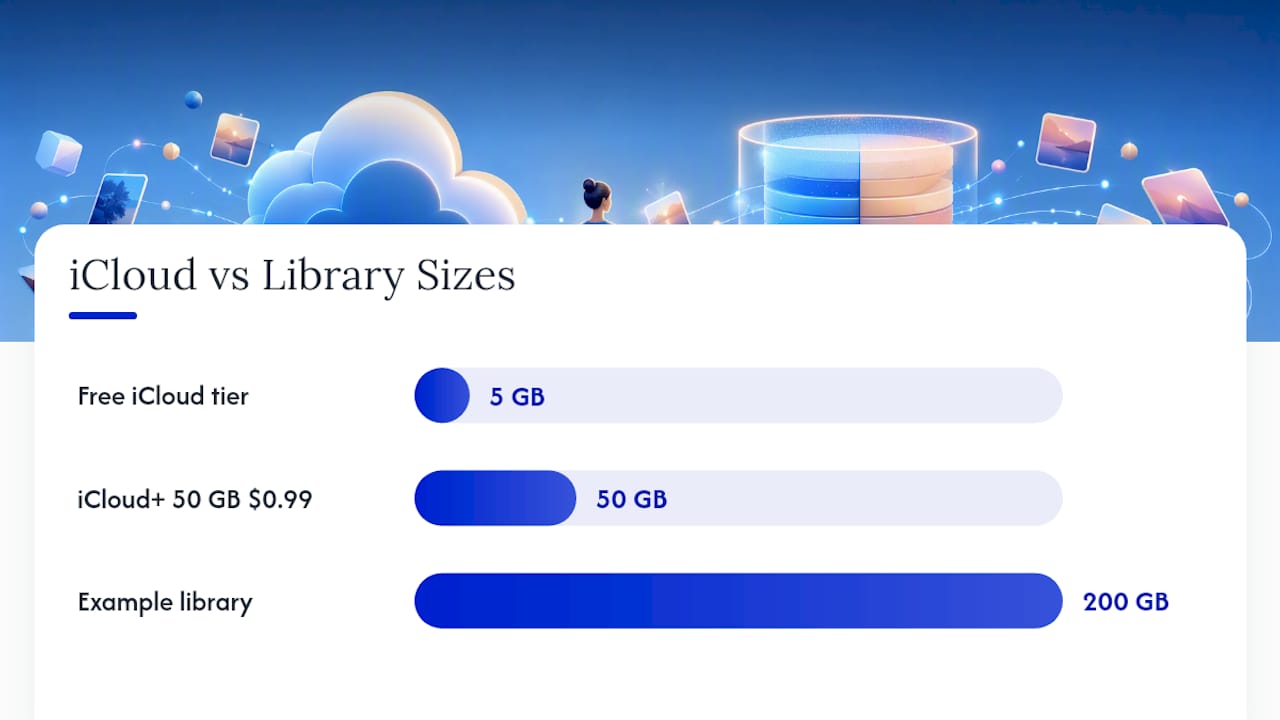
Optimize iPhone Storage is the setting that solves this for most people. Found under Settings > Photos, it works alongside iCloud Photos, and here’s the mechanic that matters: your full-resolution originals get stored in iCloud, while your phone keeps smaller, space-saving versions locally. Open a photo and it downloads the full version on demand. Apple explains the exact requirements for this to work correctly, and the biggest one is that you need iCloud Photos turned on and enough iCloud storage headroom for your whole library to sync first.
That last part trips people up. If your library is 200 GB and you’re still on the free 5 GB iCloud tier, optimization can’t do its job because the originals never finish uploading. This is where paying for more room becomes the practical move. iCloud+ plans start at $0.99 a month for 50 GB, which covers a modest library, with larger tiers available if you’re a heavy photographer or videographer.
If you’d rather not pay for cloud storage at all, two other paths work:
- Transfer everything to a computer. Plug your iPhone into a Mac or PC and use the Photos app, Finder, or the Apple Devices app to copy your library over, then delete the originals from your phone. Apple’s storage guide covers how to view and manage synced content directly from a connected computer, which is also the only way to remove certain synced items that won’t budge from the phone alone.
- Use a third-party cloud service. Google Drive, Dropbox, or similar apps let you upload photos and videos and free the local copies, without touching your Apple ID storage at all.
Within the Photos app itself, a few smaller moves add up. Apple’s photo tools include a Review Large Videos or “Duplicates” section on newer iOS versions, which surfaces near-identical bursts and lets you clean them out in a couple of taps. Emptying Recently Deleted matters too, since deleted photos sit there for up to 30 days still taking up space until you empty the album manually. And if you shoot a lot of Live Photos or use Burst mode, consider dialing that back in Camera settings; every burst can generate dozens of near-duplicate frames that quietly stack up over months.
Pro Tip: If you’re optimizing a large library for the first time, do it on Wi-Fi while your phone is plugged in and left alone overnight. A library in the hundreds of gigabytes can take a full day or two to sync, and interrupting it mid-upload is the most common reason people think “Optimize Storage” isn’t working.
Clearing Out Large Messages Attachments
Text threads are a quiet storage drain. Years of photos, videos, voice memos, and GIFs pile up in Messages, and most of it you’ll never look at again.
Go to Settings > General > iPhone Storage > Messages. You’ll find two useful views: Review Large Attachments, which sorts every media file in your message history by size, largest first, and Top Conversations, which shows which threads are hoarding the most space. Explainers consistently point to this screen as one of the highest-impact, lowest-risk places to reclaim gigabytes, because you’re deleting copies of media, not the only copy.
Before deleting anything you want to keep:
- Tap the attachment to preview it first.
- Save anything worth keeping to Photos or a cloud service.
- Swipe to delete once you’ve confirmed the save.
- Head back to Photos afterward and empty Recently Deleted, since saved files often route there and don’t actually free space until you clear that album too.
If you use WhatsApp or Telegram heavily, check their in-app storage settings separately. WhatsApp’s Storage and Data menu lets you sort chats by size and bulk-delete media per conversation, while Telegram has similar cache-clearing options buried in Settings > Data and Storage. Neither shows up cleanly in Apple’s Messages breakdown, so if your iPhone Storage screen lists WhatsApp or Telegram as unusually large, the fix lives inside those apps, not in Settings.
Offloading and Deleting Apps: What’s the Difference
Offload Unused Apps removes the app itself but keeps your saved data, so reinstalling later restores everything as it was. Delete App wipes both the app and its data permanently. For most storage cleanups, offloading is the safer default, and you can turn on automatic offloading under Settings > App Store so iOS handles it going forward without asking.
But offloading doesn’t fix every problem. Some apps aren’t bloated because of the app itself. They’re bloated because of what’s stored inside them. Tap into any app’s individual storage page and you’ll see two separate numbers: App Size and Documents & Data. If an app is 40 MB but shows 4 GB of Documents & Data, that’s your cache offender, usually a chat app, a podcast player, or something with heavy local media caching.
- App Size stays roughly fixed unless there’s an update.
- Documents & Data grows over time with cached images, downloaded content, and local databases.
- A wide gap between the two numbers means the app’s cache, not the app itself, is the real problem.
When offloading doesn’t shrink that Documents & Data number enough, reinstalling the app from scratch clears the cache more thoroughly than offloading alone. Delete it completely, restart your phone, then reinstall from the App Store and log back in.
Pro Tip: Social media and streaming apps are the usual repeat offenders here. If Instagram, TikTok, or a podcast app keeps ballooning back to several gigabytes within weeks of a cleanup, that’s cache accumulation, not new content, and a full delete-and-reinstall every few months keeps it in check.
Removing Downloaded Music, Podcasts, and Videos
Offline media is one of the sneakiest space hogs because it doesn’t feel like “your stuff.” It’s downloaded content sitting in the background, and it accumulates fast if you have autodownload settings turned on.
In the Music app, go to Library > Downloaded to see every offline song and album, then bulk-delete anything you’re not actively listening to. There’s also an Optimize Storage setting under Settings > Music that automatically removes downloaded music you haven’t played recently once you’re low on space, so you never have to think about it again.
Podcasts work similarly. Open Settings > Podcasts and limit episode downloads to just the latest one or two per show instead of letting every new episode auto-download and sit there indefinitely. This alone can save gigabytes for people subscribed to a dozen or more shows.
For downloaded movies or shows in Apple TV or similar apps, check the app’s own downloads section, since these files are often several gigabytes each and get forgotten after a single watch on a flight or commute.
A useful distinction: downloaded media shows up as its own line item under the Storage screen’s Media category, separate from app cache. Cache is invisible junk apps generate; downloads are content you explicitly chose to save offline. That means clearing downloads is entirely safe. You’re just removing something you can redownload anytime, not touching anything unique to your device.
Understanding “Other” and System Data (and Why It Grows)
System Data, sometimes still labeled “Other” on older iOS versions, is the category people find most confusing and most frustrating. It covers caches, log files, Siri voice data, temporary files from updates, and fragments left behind by apps that didn’t clean up properly. iOS removes some of this automatically, but it can still balloon after heavy use or an OS update, sometimes climbing to 10 or 20 GB with no clear explanation from the Storage screen itself.
A few concrete steps actually move the needle:
- Clear Safari’s cache. Go to Settings > Safari > Clear History and Website Data. Browser cache is one of the biggest hidden contributors to System Data, especially if you keep dozens of tabs open for weeks.
- Reinstall cache-heavy apps. As covered above, this purges local databases that offloading alone won’t touch.
- Remove downloaded videos and voice memos you’ve already reviewed, since these sometimes get miscategorized under System Data rather than Media.
- Restart your phone. It sounds too simple, but a restart clears some temporary caches that build up during normal use.
Pro Tip: If System Data stays large no matter what you clear, check for a pending iOS update. Apple reserves space for downloaded update files before installation, and that reservation can look like unexplained System Data until the update either finishes installing or you cancel it.
Sometimes none of this works, and System Data just won’t shrink. That’s not a sign you’re doing something wrong. It usually means orphaned files have accumulated that iOS itself can’t identify as safe to delete, which is exactly the situation the next section covers.
Advanced Fixes for Storage That Won’t Budge
When the standard steps stall out, three tools are left, ranked from safest to most involved.
- Back up, then erase and restore. Connect to a computer or use iCloud to create a full backup first. This is non-negotiable; skipping it risks losing photos, messages, and app data permanently. Once backed up, erase the device (Settings > General > Transfer or Reset iPhone) and restore from that backup. This process rebuilds System Data from scratch, which is the most reliable way to clear orphaned caches that normal cleanup can’t touch, since Siri voice files, fonts, and app logs sometimes fail to purge after heavy use or an update.
- Turn off Automatic Updates temporarily. Under Settings > General > Software Update > Automatic Updates, disabling this stops iOS from reserving space for a downloaded update you haven’t installed yet. It’s a small, safe win, usually worth a gigabyte or two, but remember to turn it back on once you’re clear so you don’t fall behind on security patches.
- The date-forward trick. Some community explainers describe manually setting your device’s date a few days ahead to trick the system into purging temporary files tied to expiration timestamps. This is not an Apple-endorsed method, and it can cause app glitches, notification issues, or calendar problems while the date is off. If you try it, back up first and set the date back immediately afterward.
Pro Tip: A backup-and-restore is worth doing once a year even if storage isn’t full, simply because it clears out digital clutter iOS never surfaces on its own.
If none of this resolves things, or if your storage numbers look genuinely wrong (like a device reporting itself as full when the math doesn’t add up, or storage that won’t clear even after a restore) that’s usually a sign of something deeper than housekeeping, possibly a hardware fault or corrupted storage chip that needs a professional look rather than another round of settings tweaks.
When Cleanup Isn’t Enough: A Professional’s Take
Most “storage full” cases get solved with the steps above. I’d bet the vast majority resolve after offloading a couple of apps, clearing Messages attachments, and turning on Optimize iPhone Storage. That’s not a knock on those methods; it’s just how consistently effective they are when done in order.
Where I’d stop DIY-ing and get a second opinion: if your Storage screen reports numbers that don’t add up (say, 40 GB of “System Data” that won’t shrink after a full backup-and-restore), if the device is unusually slow or hot alongside the storage warning, or if you suspect a hardware issue rather than digital clutter. Those are signs of something a factory reset won’t fix.
Always back up before anything destructive; transferring your contacts and data first protects you regardless of what comes next. If it turns out to be hardware, Repair Genius handles that side directly, with on-site service in Orlando and Winter Park, same-day turnaround, and a strict focus on keeping personal data secure throughout the repair. Transparent pricing means you know the cost before any work starts. For the physical stuff cleanup can’t touch, that’s when it’s worth calling in a professional.
— Michael
Sources
This guide draws on Apple’s own documentation for checking iPhone storage and optimizing Photos storage, which cover the official recommendations engine and iCloud Photos requirements. Practical, hands-on steps come from Cult of Mac’s storage walkthrough, CNET’s cache-focused explainer, and PCMag’s cleanup roundup, each of which contributed specific, tested steps rather than general advice.
- How to check the storage on your iPhone and iPad – Apple Support
- When iPhone storage is full, here’s what you should do | Cult of Mac
- How to free up space on your iPhone or iPad – PCMag
Recommended
- Face ID Repair: Quick Fixes and When to Get Help
- How to Transfer Contacts Before Phone Service
- Phone Camera Repair: Fix It Yourself or Call a Pro?